The data import function enables importing accounting data from another system into Netvisor in CSV (Comma delimited / List separator) format. There is a separate guide for importing accounting data from Fivaldi to Netvisor: Kirjanpitotietojen tuonti Fivaldista Netvisoriin
CONTENTS
- Permissions and settings
- Preparation of material to be imported
- Fields used in accounting data import
- Starting the import of accounting data
- Linking account information
- Example materials
- Common error situations and their handling
- Frequently asked questions
Permissions and settings
The data import function is available for all companies without additional costs. You can find the data import function in Netvisor from the Company menu located in the interface: Company menu > Data import and export > Data import. The user importing the data must have Sales, products, purchases and accounting section specific rights "Basic information management" and "Basic information import".
Before importing data, it must be checked that the financial period to which the data is being imported is established in Netvisor (Accounting > Financial statements > Financial period management > New financial period)
Preparation of material to be imported
It is advisable to make at least these preparations for the material to be imported into Netvisor before the import. This way, error situations can be avoided.
- Check with the accountant if necessary that the material is correct in terms of accounting
- Removing empty columns and rows
- Removing so-called unnecessary data
- Removing balance rows
- Copying voucher and date information to each row to be imported
- Removing extra spaces
- Also check that all mandatory information for the import is present. See the section "Fields used in accounting data import"
- The file is saved in csv format (Comma delimited / List separator)
- The file can be zipped to speed up the transfer
- The file name does not contain special characters
If opening balances or data from previous financial periods are being imported, it is also good to consider these
- The material must be imported by financial period, i.e. one material can only contain transactions from one financial period. Multiple financial periods can be imported, each financial period is imported as its own csv file.
- You can import accounting data from previous financial periods as opening balances or vouchers, e.g. as journal or general ledger material. If you import voucher material as a journal or general ledger, it is recommended to also import opening balances for the preceding financial period. For example, if historical data is imported into Netvisor with journal material starting from financial period 2023, opening balances are needed as of 31.12.2022
- The financial period's profit/loss should not be imported with the material. Netvisor automatically records the financial period's profit/loss when the financial period is closed.
- Netvisor has default bookkeeping accounts that the program uses for automatic entries, and it is not recommended to record e.g. opening balances or other own entries on these. See replacement accounts in the table below
| Data cannot be imported to the following accounts | Alternative accounts |
| 1701 | 1702 |
| 1763 | 1761 |
| 2371 | Financial period's result account: do not import |
| 2375 | Financial period's result account: do not import |
| 2939 | 2946, 2948 |
| 2871 | 2872, 2873 |
Mandatory information in the material includes
- Date of the voucher
- Account number
- Debit column and Credit column*
- Or Sum column*
Fields used in accounting data import
If all compulsory information fields are not given, the import cannot be done. The information has to be given in rows.
| Imported data | Description |
| Voucher type | The given voucher type is shown in the row's row specification field in parenthesis. The voucher type for imported vouchers is always "Pump Tuodut tapahtumat" |
| Voucher number | Voucher number. If the voucher number is not provided in the material, the import will set the same day's entries on the same voucher. |
| Date (PVM) | Compulsory. Note that import doesn't check VAT and financial period locks set in Netvisor. |
| Specification 1-5 | There can be a maximum of 255 characters in Specification columns altogether. Note! If specifications include special characters, e.g. / , the limit is smaller. In this case, shorten the specification well below the maximum limit. |
| Account number | Compulsory. Only the account number, no name. Max 55 characters. |
| Debit | Compulsory*. Given without thousand delimiter or with space as thousand delimiter, not point. Decimal delimiter is comma. Empty information is given as zero (0). |
| Credit | Compulsory*. If debit and credit are in their own columns, the credit numbers must have a minus sign (-) and empty information must be given as zero (0). Given without thousand delimiter or with space as thousand delimiter, not point. Decimal delimiter is comma. |
| Sum ( + = Debit / - = Credit) | Compulsory*, given without thousand delimiter or with space as thousand delimiter, not point. Decimal delimiter is comma. Credit entries are separated by a prefix -. |
| Sum ( - = Debit / + = Credit) | Compulsory*, given without thousand delimiter or with space as thousand delimiter, not point. Decimal delimiter is comma. Debit entries are separated by a prefix -. |
| Vat id | Vat id. You can check Netvisor's VAT IDs here. E.g. KOMY. Mandatory if VAT percent is given. |
| VAT percent | VAT percent. E.g. 24, 25.5. Decimal separator is comma. No percent sign, only the number. |
| Cost object header | Cost object header as in Netvisor. The cost object header must be established in Netvisor before import. |
* = Debit and Credit fields are not compulsory if the Sum field is used. Sum fields are not compulsory if the material has Debit and Credit fields.
Debit and credit can also be given in the same column, in which case they are separated with + or - signs. If debit and credit are in their own columns, the credit numbers must have a minus sign (-) and empty information must be given as zero (0). A column without a sum cannot be empty, but must have zero as a filler.
Accounting data is always imported using net handling, which means the system doesn't calculate VAT rows automatically, so VAT rows must already be included in the import material. Imported vouchers must be completely ready in the import file, as no automatic VAT handling is done for them in Netvisor. If you want to use gross handling in the import, you can use ÄlyExcel.
If the voucher line doesn't have a VAT percentage or Vat id, the system sets default values: 0% and "No VAT handling".
Example materials for download can be found in the section Example materials.
Starting the import of accounting data
If you are importing opening data from the previous financial period, open the previous financial period in Netvisor if necessary.
- Open the Company menu and select Data import
- Select the data type as Accounting data import
- Select the separator, which can be a semicolon, colon, equals sign, or tab. The separator is chosen according to the separator in the Excel file to be imported.
- Find the file containing the accounting material you saved on your computer by selecting the Choose file button
- Finally, press the Submit data button


- Linking voucher fields. In the next step, the fields of the imported data are linked to the corresponding fields in Netvisor's voucher. By opening the dropdown menu, a dropdown menu opens for each column, and you select what information the column contains. In the picture below, the selections have been made. When all selections have been made, press Update headers. If the first row contains column headers, select First row contains column headers (do not import). Once the links have been made, press Import rows button.

- Linking cost objects. If the material has cost objects, the next step is to link the cost objects. In the view, you can also create entirely new cost objects and change the cost object header.
If the material has cost objects that are already found in Netvisor, these are automatically suggested. The cost object in the material is shown on the left side and the suggestion for linking on the right side. The cost object can be changed from the dropdown menu. When the cost object selections have been made, select Save and continue.
Creating a new cost object If the material has cost objects that are not yet found in Netvisor, they can be established during the import. Select +Create new cost object, enter the name of the cost object, and save. The system establishes a new cost object immediately after pressing the Save button. Changing the cost object header If you want to change the cost object header, it can be done by clicking the Pencil icon next to the cost object's name. A new cost object header is selected from the menu. New cost object headers cannot be established during the data import. Please note that after changing the header, the cost object links must be made again. The same named cost object cannot be under two different headers.
- Linking bookkeeping accounts. At this stage, the bookkeeping accounts in the material are linked to Netvisor's bookkeeping accounts. New bookkeeping accounts cannot be added during the import, nor can existing ones be modified. Bookkeeping accounts can be managed through the specification of accounts.
Original account number This column shows the account number in the Excel file Linking bookkeeping accounts
Netvisor account number This column shows the selectable bookkeeping account in Netvisor. Selections can be made manually or automatic suggestions can be used, see the guide section Account linking templates
Included in import Whether the account entry is imported or not
ChangeFinancial period
Financial period to which the data is added The financial period to which the data is being added is shown
Financial period status The status of the financial period to which the data is being added
Manage financial periods The link Manage financial periods leads to the financial period management view(opens in a new tab).Account linking templates
Automatic suggestions Automatic account suggestions can be searched with the first 3 or 4 digits and/or based on the account name. The button Load linking suggestions makes suggestions based on the selections. If a corresponding account is not found, the selection must be made manually.
Note the accounts used in default postings Accounts used in default postings are accounts used in the system's automatic entries. To ensure the functionality of automatic reporting, importing material to these accounts is not desirable. By noting these accounts, blocked accounts are replaced with suitable alternatives in the offered linking suggestions.
Use a ready-made template Templates can be selected from system-provided or user-created linking suggestions. The desired template is selected from the dropdown menu and the Load linking suggestions button is pressedTemplate management
Template management is found through the three dots (see the picture below)
Save links to template... When the desired links have been made between the imported and existing account numbers in Netvisor, a new template can be saved with the desired name or an existing template can be updated with new link information. This way, the template can be used in similar imports in the future, and the link information can be obtained automatically without making link information selections again.
Manage templates Existing templates can be deleted from here When all bookkeeping accounts are linked, select Save and continue. Links can also be saved as in progress by selecting Save as in progress.
 - Confirmation of data import In the view, you can still check the material to be imported. If in the Linking bookkeeping accounts view you selected Included in import > No, this selection is shown under the orange header "Original account number (not included in import). When you have checked the information, select Confirm import and the system creates the bookkeeping voucher(s).

After the import, the program directs the user to the accounting reports, where the created vouchers can be checked. If errors are found in the imported accounting data, the created vouchers can be invalidated in bulk by selecting "Invalidate vouchers". The Data imports table shows In progress imports and Completed imports
In progress imports This shows the timestamp, data type, user, additional information, and status of the in-progress import. The Continue button allows you to continue the import that was left unfinished. The Delete button allows you to delete the in-progress import.
Completed imports This shows the timestamp, data type, user, additional information, and status of the completed import.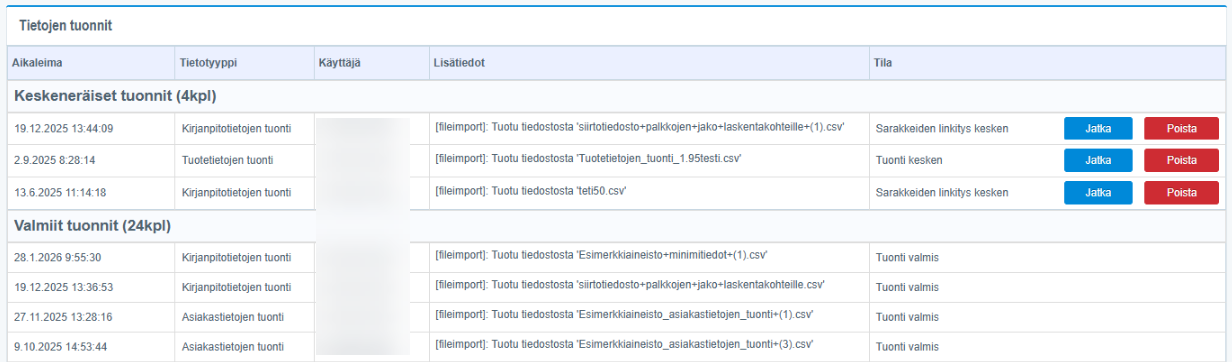
Example materials
Here are example files for importing accounting data:
Common error situations and their handling
-The character limit in the Specification column is exceeded. The total maximum number of characters in the Specification column is 255, but if special characters (comma, slash) are used in the column, the number of characters must be significantly reduced.
Frequently asked questions
Keywords: Accounting data, Netvisor, CSV file, Financial period, Voucher data, Import, Posting, Permissions
Did you find it helpful? Yes No
Send feedback