This guide provides instructions on how to create and manage offers in Rackbeat. The guide covers creating, editing, sending, and converting an offer into an order.
CONTENTS
Rackbeat's sales process is based on the chain offer - order - delivery - invoice. Each step is not mandatory, meaning the chain can start, for example, directly from the order.
In Rackbeat, you can create an offer for a customer, which you can later convert into an order if the customer accepts the offer.
The offer does not transfer to Netvisor, but remains entirely within Rackbeat.
Creating an offer
Select the Sales tab at the top of the page > click Offers from the menu

Click the "Create New" button in the top right corner.

Select a customer from the list (If you have multiple customers, you can press the Show more results button to see the entire customer list or search for the customer's name/customer number by typing directly into the field.) At the end of the list, there is a "Create" button if you want to create a new customer at this point.
Click the Create and Edit button, which opens the offer editing view.

Offer view
The numbering of offers is sequential, meaning the offer number will always be one number higher than the previously existing offer in the program.
Customer
The customer's address details come from the customer's settings, but these can still be edited from the offer view. There may also be an added note behind the customer, which appears immediately below the delivery address.

Notes
The fields define on which day the offer is made, until when it is valid, and whether a possible delivery date has already been set for the offer.
With the offer title and notes, free-form additional information text can be added to the offer document.

References
By default, the "Our Reference" field contains the details of the person making the offer, but you can change this. In the "Our Reference" field, you can select someone from the Rackbeat Employees list.
In the possible customer discount percentage section, you can change the discount percentage the customer receives for the entire offer if desired. The default percentage comes from the customer information's discount percentage field.
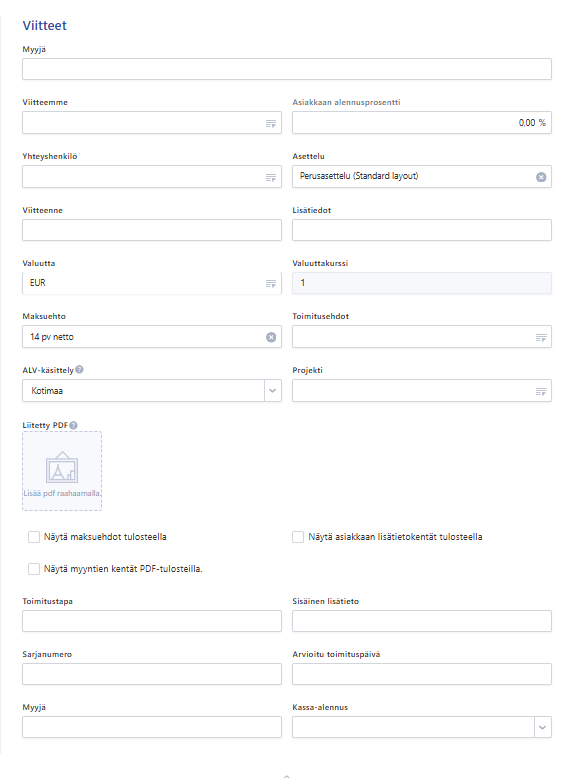
The "Your Reference" information also comes from behind the customer. The "Your Reference" field is a free text field.
In the Additional information section, you can provide additional information related to the offer. The maximum length of the field is 80 characters.
Additional setting fields for the offer can be obtained by pressing the arrow icon, allowing you to define the currency, payment terms, and terms of delivery. This information is automatically retrieved from the customer's settings, but you can still change them at this point.
The VAT handling section affects the determination of the vat percentage. By default, the selection is retrieved from the customer's information, but this can be changed on an offer-by-offer basis. A PDF file can also be attached to the offer.
In the Layout section, you define which document layout you want to use.
In the Project field, you can select a project if the offer belongs to a project. The information does not transfer to Netvisor but is only for internal use within Rackbeat. If there is a default cost object behind the product or customer in Netvisor, the default target will automatically be included in the invoice and accounting voucher.
You can also add other sales-related additional information to the offer, such as delivery method and estimated delivery date. The delivery method field appears by default, but you can edit the fields from the company's basic information and settings -> General -> Fields -> Sales. The fields are visible on the offer by default only internally, but they can also be made visible on the offer sent to the customer by clicking the checkbox "Show sales fields on PDF prints."
Adding product rows

Adding a product row starts with the product row button. Product rows can be added to the offer either one at a time or multiple by selecting the package product addition. From the product settings, you can choose which products belong to a specific package. Additionally, comment rows can be added to the offer.

An existing product is selected from the product row for the offer. At the end of the list, you can create a product if it has not yet been established.
On the product row, you can reprice the product if necessary, and you can always see the profit percentage. Similarly, the product's stock status is visible.
In the Quantity field, enter the number of units, how many products will be on the offer. The price and stock information come from the product settings, but these can still be edited at this point. When a product is added to the order, after selecting the product, the Fields menu is activated at the top of the view next to the General heading. From here, you can change the desired fields if necessary:

When the rows are ready, they appear on the front page of the offer.
On the right side of the row, the three dots button allows you to edit or delete the product row.

The order of the rows can be changed by moving the mouse over the gray arrow icons and holding down the left mouse button, moving the row to the desired position.
Sending the offer
When the offer is ready, you can send/confirm it with the Confirm button.
The offer can be sent by email. If you want to send the offer/order to multiple recipients, the emails should be separated by a comma. The view can still be used to edit the sending information and the recipient's address. If you want the recipients not to see other recipients, the addresses should be placed in the BCC field (blind carbon copy).

When the offer is sent, the offer opens on the page after sending. The sending attempts section shows more details about when the sending occurred.

At the top of the offer, there is a functions menu where you can choose whether the customer accepted or rejected the offer. You can also print a PDF of the offer, download this PDF to your computer, or send it again to the customer by email if necessary.

The Delete button removes the offer.
After approval, the offer can be directly converted into an order. If you select an invoice from the list, the offer becomes an invoice directly. If the customer rejects the offer, the offer changes to the "rejected" status.

Convert offer to order
Once you have sent the offer to the customer and the customer has accepted it, you can convert the offer into a sales order.
- Select Sales> Offers from the top
- Find the offer you want to convert into an order from the offer view
- Click the three small dots on the right side of the offer row
- Select the checkmark in the middle "Customer has accepted"

A box will appear where you can convert the offer into a sales order or invoice
- Select Convert to order
- Click the Accept and convert button.
The offer is now converted into an order draft, which you can also find through the order list. At this point, you can directly edit the order.
Finalize the order by clicking "Send to customer". If an attachment has been added to the offer, the attachment will be sent with the email to the customer. When an order is created from an offer, the attachment does not follow the order, and the order attachment must be added separately if needed. The attachment also does not transfer to Netvisor with the order.
If you select an invoice directly from the list, the offer becomes an invoice directly. The order phase can thus be skipped, but after this, a delivery of the product must be created through the invoice to reduce the stock value.

Keywords: Rackbeat offer, offer number
Did you find it helpful? Yes No
Send feedback