This guide explains how to add users to the company's Netvisor and manage their user rights. You can also read more about user rights in the compiled guide: FAQ user rights.
CONTENTS
- Managing user rights
- Managing the company's administrator
- Adding a new user (inviter's process)
- Inviting a user (invitee's process)
- Adding a user from the company's employees
- Sales, products, purchases, and financial section rights
- Payroll rights
- Editing a user
- User account validity
- Deleting a user
- Authorizing a user to another company
- User rights report
Managing user rights
Users with the user administrator (KH) role and/or accounting office's administrator (TPK) role can edit the user rights of other company users. The company or accounting office is responsible for the correctness and management of user rights.
- Changes to user rights can be made by Netvisor experts only in exceptional cases.
- In such cases, a written request must be made by the company's Netvisor environment administrator or the company's authorized signatory.
Adding and copying users and user rights requires strong authentication.
- Perform strong authentication using the Netvisor mobile application or bank credentials. (This measure improves our customers' security and ensures the identity of the person adding user rights.)
- Additional verification is user and session-specific:
- If, as a user administrator, you add or copy several users or user rights during the same login session, you only need to authenticate for the first addition in that session.
- Exception: If the company has enabled Payment additional verification (Company menu > Sales and accounts receivable rights > Payment confirmation settings > Payment additional verification), you must authenticate for each user addition.
User rights management is done on a company-specific basis.
- Manage the users of the currently selected company who are employed by that company.
- From the same view, you also manage the rights of external users (for example an accountant or an auditor) who have been granted access rights to that company.
You can view the company's users and their user rights by selecting Company menu > Users and roles.
- Only users with the accounting office's administrator (TPK), user administrator (KH), or auditor (TT) role can access this view.
- TPK and KH users can edit the user rights of other users.
Managing the company's administrator
“The administrator refers to a natural person appointed by the customer, who is granted the service's administrator rights, which include the rights to create new user accounts, add or remove service sections, and sign agreements within the service; and who acts as the customer's representative.”
Adding a new user (inviter's process)
From 1 April 2026 onwards, adding a new user to Netvisor takes place through an invitation process.
- The invitation verifies the user's identity with bank authentication and two-factor authentication (email and text message).
- The KH user approves the user and grants them user rights only after the authentication has been completed.
If you want to grant the user rights to another Netvisor environment, follow the instructions in Authorizing a user to another company. In that case, you do not use the invitation process.
- Open the invitation function by selecting Company menu (company name at the top left) > Users and roles or User invitations.
- In the Users and roles view, you can see the environment's active and passive users.
- You can start the invitation process from either the Users and roles or User invitations tab.

- Select the Authenticate to invite user function.
- Perform strong authentication to verify the identity of the user administrator.
- Authenticate using the Netvisor mobile application or bank credentials.

- After authentication, wait for the Users and roles or User invitations view to open (depending on which view you authenticated in).
- Select Invite user.

- In the window that opens, select how you add the user.
- If the user has Finnish online banking credentials, add them:
- from the company's employees or
- by selecting Invite new user and entering the user's name, email, and phone number.
- Do not handle the invitee's personal identity code.
- If you are adding a foreign user, follow the instructions in Logging in and inviting a foreign user.
- You can also choose the language in which the invitation is sent. In addition, you can select English or Swedish as the language.
- If you wish, you can order an email notification for selected user administrators when the user has activated their invitation and is waiting for the user administrator's approval. The confirmed email address in the inviter's basic data is used for communication.
- If the user has Finnish online banking credentials, add them:
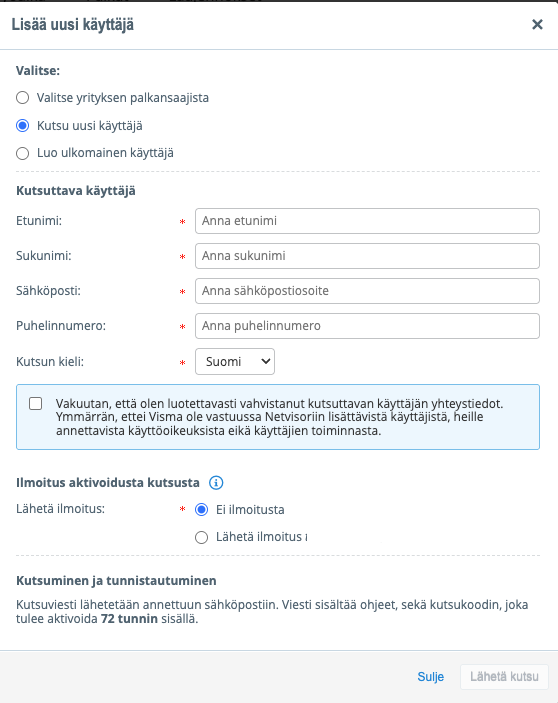
- Enter the user's details and select Send invitation.
- An invitation message is sent to the invitee's email address.
- The message contains instructions and an invitation code that must be activated within 72 hours.
- You can follow the status of the invitation:
- An overdue invitation is shown to the KH user with the status Invitation overdue.
- Open the invitation by clicking the invitee's name and resend the invitation if necessary.
- In the same view, you can edit the invitee's contact details if needed.

- Approve the user once the invitee has successfully completed the authentication process.
- When authentication is complete, the invitation status changes to Waiting for approval.
- Open the invitation by clicking the user's name.

- Check that the invitee's name matches the information obtained through strong authentication.
- If the information matches, select Approve and continue.
- If the name information does not match:
- Contact the invitee or a user with the P role if the invitee was added from the company's employees.
- Note that the system allows approving the user even if the name information does not match.
- If the user was added from the employees and the personal identity code in the employee list does not match the personal identity code obtained through strong authentication:
- The system will notify you of this and approval cannot be done.
- Check the personal identity code and, if necessary, invite the user again.

- Define the user's user rights and create the user.
- Define the necessary user rights after approval.
- You can later change the user rights if needed by selecting Company menu > Users and roles.
- Select Create user once the user rights have been defined.
- When the user has been created:
- The user is moved from the User invitations view to the Users and roles view.
- An email notification of the completed approval is sent to the user.
- The user can then log in to Netvisor.

Valid until further notice: By default, the user right is set to the Valid until further notice field, meaning the user right is valid until you remove it.
Fixed validity period: Remove the selection from the Valid until further notice field and define the validity period of the user right.
- After the validity period ends, the user cannot log in to that company.
- Note that ending the validity period does not stop email communication from the company (for example purchase invoice factual verification, approval, payment).
- If you want to stop communication:
- remove the user's accounts payable rights or
- modify the communication settings in the user's personal information.
Inviting a user (invitee's process)
- Give your name, email address, and phone number to the company's TPK or KH user so that they can start the invitation process in Netvisor.
- Wait for an email from Netvisor containing an 8-character confirmation code.
- Note that for security reasons there are no direct links in the email.

- Open the address https://login.netvisor.fi/fi in your browser.
- Select Activate your invitation code.
- Authenticate with online banking credentials.

- After authentication, enter the 8-character invitation code in the view that opens.
- Note that the code is valid for 72 hours from sending.
- If you enter the code incorrectly more than 3 times, the invitation is locked and the KH user must send a new invitation.
- If the invitation code has expired, you will be notified and the KH user must start the invitation process from the beginning.

- After you have successfully entered the invitation code, wait for the SMS confirmation code sent by text message.
- The text message code is valid for 10 minutes.
- If the code does not arrive, you can request a new code (up to three times).

- Complete the authentication process according to the instructions.
- Wait for the company's user administrator to check and approve you as a user.
- Note that you cannot log in to Netvisor immediately after the invitation process.
- Wait for an email notification that the approval has been completed.
- Netvisor support cannot approve the user; the approval is always done by the company's Netvisor environment KH user.

- After approval, log in to Netvisor.
- You can log in with the Netvisor mobile application or with your online banking credentials.
Adding a user from the company's employees
- Select the user from the company's employees if the person is already an employee in the company.
- The menu shows all the company's employees.
- Note that this option is only visible if the company has the Payroll package in use or the additional services “Payroll and time tracking” or “Travel and expense claims”.
- You only grant the selected user access rights to that company.

- Check the employee's details.
- When you select an employee, you can see the email and phone number found in the employee information below.
- Use this information for identification, as there may be employees with the same name in the company.

- Define the user's personal information.
- Note that you cannot change the user's name in this view.

- Define the necessary profiles and roles for the user.
Sales, products, purchases, and financial section rights
- All rights – the user has all rights to the Accounting section.
- Accounts receivable user – the user has rights to the Sales section.
- Accounts payable user – the user has rights to the Purchases section.
- Accounts payable and receivable user – the user has rights to the Sales and Purchases sections.
- Viewing– the user has viewing rights to all sections.
- Viewing rights must also be specified separately for the payroll section.
- Note that selections are not shown if the sections are not enabled for the company.
- Company user– same as All rights, but only read rights for basic bookkeeping functions and income tax declarations.
- The user cannot create manual vouchers for the company.
- The user cannot send the income tax declaration.
- No rights– the user has no rights to the Accounting section.
- The user can access Electronic signing to view public documents.
- The user can access Extensions to the eScan processing view and eScan settings to create user accounts.
- The user can access Netvisor Store but cannot perform any actions there.
User administrator (KH) – can manage the company's users and services.
- With the KH role, you can create new users and manage services.
- You can create an accountant (KP), but you must not create another user administrator (KH).
- You must not add the accounting office's administrator (TPK) right or the payroll accountant (P) right.
- You must not add rights to yourself or change your own rights in user rights management.
- You can add the KH role to another user only if you have TPK or KH+administrator user rights.
Accounting office's administrator (TPK) – a role belonging to the accounting office.
- You can create KH and KP roles, but you must not create another TPK role.
- The TPK role can be given only with TPK or KH+administrator rights:
- by copying user rights to the user (see the guide Copying user rights) or
- in exceptional cases by Netvisor support.
- Note that once the TPK role is obtained, the user is automatically added as a user to new companies created by the accounting office:
- The user receives TPK + KH + KP rights (+ P rights if the payroll section is enabled in the company) for that accounting office client.
- If you do not want an employee with the TPK role and TPK rights to client companies to see information about the accounting office itself:
- give the user TPK rights to the accounting office without KH rights and
- define the user profile so that the user can have No rights to the accounting office itself.
- Note that the user will still receive TPK + KH + KP rights for new companies opened.
- The user cannot open a company themselves under the accounting office, but they can open a company under another company where they have KH rights.
- In the background, the accounting office link always goes under the opener's base company.
- You can remove the TPK role from the user by copying user rights from a user who does not have the TPK role.
Accountant (KP) – can perform more demanding accounting tasks in the company.
- Send a control notification.
- Delete invoices and vouchers.
- Edit sent invoices and delivered orders.
- Make vat overrides and similar actions.
Auditor (TT) – a special role given to an auditor.
- Only give the TT role if you have user administrator rights.
- See detailed instructions: Auditor and tax inspector user rights.
- If the user's base company is something other than Netvisor Auditors, send a request to support to correct the base company.
- Netvisor support can correct the user's base company to Netvisor Auditors.
After the user has been added, you can edit the user's rights.
- You can define different rights for sections and functions.
The user's personal information should always be filled in as completely as possible, as it facilitates contact with the customer in potential problem situations.
Once the TT user has been added, they only have basic rights to the company.
- Additionally, define rights to:
- accounts receivable and accounts payable
- the information view
- the financial period archive.
Payroll rights
If payroll has been enabled in the company, give the user the necessary rights to payroll.
More detailed information about payroll rights is provided in the payroll guide Function-specific payroll rights and payroll roles.
In payroll, the following profiles and roles can be given.
Profiles
- Employee profile:
- Do not give rights to payroll or editing basic information.
- Give the right to enter and edit time management (time tracking and travel claims) data if the Travel service is enabled for the employee.
- Give the employee the right to see their own payroll basic information and to view and print their own payslips.
- Note that with this right the user also sees public electronic signing invitations in Netvisor.
- All rights profile:
- Grants all rights to the HRM side.
- Give this profile to the payroll accountant.
- Remember to also give the payroll accountant the payroll accountant role (P).
- Approver profile:
- Do not give rights to payroll or editing basic information.
- Give the right to edit time management data (for example approving travel claims and time entries).
- Assign sufficient hierarchy rights to the approver so that they can see their subordinates' time entries and travel claims.
- Company management profile:
- Give the right to see payslips and reports.
- Do not give rights to perform monthly or annual obligations.
- Do not give the right to edit basic information.
- If you want company management to be able to view payroll phases, give viewing rights (or editing rights if desired) to payroll and to managing salary models and types from function-specific rights.
- Viewing profile:
- Grants viewing rights to the payroll side.
- No rights profile:
- No rights to the payroll section.
Roles
- Payroll accountant role (P):
- Give the P role to the user who calculates salaries (the role is mandatory for the payroll accountant).
- It is recommended that the payroll accountant has the payroll profile All rights.
- The payroll accountant also needs payment rights from accounts payable rights to pay salaries.
- Only the accounting office's administrator (TPK) or the Netvisor environment administrator visible on the company's management front page, who also has the user administrator role (KH), can give the P role.
- Removing the role also requires the same rights.
- Do not give the P role to yourself.
- In exceptional cases, the role can be set by support.
- Foreman role (E):
- The foreman role can be given to a user in a supervisory position.
- Note that the E role respects the company hierarchy:
- The user can only see those employees to whom they have factual verification or approval rights through the hierarchy.
- The role entitles the user to see employees' salary information.
- Personal details handler (HH):
- Give the HH role to a user who manages employee information more limitedly than the payroll accountant role.
- Note that the HH role does not allow access to the payroll process or, by default, to pages containing employees' salary information.
- Note that the HH role respects the company hierarchy:
- The user can only see those employees to whom they have factual verification or approval rights through the hierarchy.
Editing a user
Edit a user by selecting Company menu > Users and roles and clicking the user's name in the user listing.
- Note that a user cannot edit their own rights in user rights management.
- Select Add new access right if you want to add access for the user to another company you manage.
- Select Edit user's personal details if you want to change the user's personal information.
If the user wants to edit their own email or phone number, instruct them as follows:
- Ask the user to click their own name in the top right corner.
- Ask the user to edit the information according to the guide My basic settings.
- In the same view, the user can also change the interface language.
User account validity
User rights can be valid until further notice or the validity period can be defined for a specific period.
- Open the user's login settings by selecting Company menu > Users and roles > click the user's name > Edit user's login settings.

Use the Update validity period for all companies option if needed.
- Update the validity period of the user right for all companies where you have user administrator rights.
- Check the number shown after the selection, which indicates how many companies the change is made to.
- List the companies by clicking the number.

Note that ending the validity period does not stop email communication from the company (for example purchase invoice factual verification, approval, payment).
- If you want to stop communication:
- remove the user's accounts payable rights or
- modify the communication settings in the user's personal information.
Deleting a user
Only users with the KH and/or TPK role can delete users and user rights.
Deleting a user with the KH role requires KH + administrator rights.
If you want to remove a user's rights from only one company, proceed as follows:
- Select Company menu > Users and roles.
- Click the desired user's name.
- Select User's other access rights.

On the page that opens, delete user rights as follows:
- Click the link in the Delete column on the row of the company to be removed.
- If the user has rights to multiple companies and you as the user administrator have rights to these same companies:
- delete rights from all or only some of the companies by clicking the link in the Delete column for the desired companies.

In the above example, the user's base company is Porin Testiyritys Oyj.
- If you remove the user's right to their base company:
- the user cannot log in to any other company, even if they have rights to them, until a new base company has been set.
- the user can set a new base company themselves or, in exceptional cases, Netvisor customer support can do it.
- when login is prevented due to the base company, a pop-up window will appear for the user the next time they log in to Netvisor, and they can select a new base company for themselves.
The base company is the company to which the user was originally added. Read more in the guide Base company in Netvisor.
- The user's base company is the active company if the Company's own user column says “Yes”.
- If the user already has credentials for another company, the column will say “No”.
- You can see users' base company in the Users and roles listing in the Base company column.
Authorizing a user to another company
Add rights for a user to another company if you have the user administrator (KH) role both in the company from which you add the right and in the company to which you grant the right.
- Find the user in a company where both you (KH) and the user to be added are users.
- Select Company menu > Users and roles.
- Click the user's name.
- Select the Authenticate to add access right link.
- Perform authentication.
- After authentication, select Add new access right.


Select the company to which you want to grant rights and click Continue.


Select the desired user profile and any special role and save.

User rights report
Use the user rights report when you want to review the user rights of the company's users in a compiled form.
- The report lists:
- the validity period of the user's rights
- roles
- function-specific rights
- sales and accounts receivable rights
- financial period archive rights.
- The user rights report can be downloaded as an Excel file by selecting Company menu > Users and roles > above the user listing the Other functions button > Download user rights report (Excel).

Frequently asked questions
Who can edit Netvisor user rights?
- You can only edit user rights if you have the user administrator (KH) role and/or the accounting office's administrator (TPK) role.
How do I add a new user to Netvisor?
- Add a new user via the invitation process by selecting Company menu > Users and roles or User invitations > Authenticate to invite user > Invite user.
How does an invited user activate the Netvisor invitation?
- Ask the user to enter the 8-character invitation code received by email at https://login.netvisor.fi/fi, authenticate with online banking credentials, and confirm the login with a text message code.
What should I do if the invitation code has expired or is locked?
- If the invitation code has expired (more than 72 hours) or is locked (more than 3 incorrect attempts), resend the invitation from the User invitations view by clicking the invitee's name.
How do I add a user from the company's employees?
- Select Company menu > Users and roles > Invite user > select from employees if the company has the Payroll package or the additional service “Payroll and time tracking” or “Travel and expense claims”.
How do I grant payroll accountant rights?
- Give the user the payroll profile “All rights” and the P role, as well as the necessary payment rights from accounts payable rights.
How do I remove a user's rights from one company?
- Select Company menu > Users and roles > click the user's name > User's other access rights > the link in the Delete column on the row of the desired company.
What does base company mean in Netvisor?
- The base company is the company to which the user was originally added. If you remove the user's right to the base company, the user cannot log in to other companies until a new base company has been set.
How do I check and report user rights?
- Download the user rights report in Excel format by selecting Company menu > Users and roles > Other functions > Download user rights report (Excel).
How do I grant a user rights to another company without a new invitation?
- Select a company where both you and the user are users, open Users and roles, click the user's name, authenticate, and select Add new access right to another company.
Keywords: Netvisor, user rights, management, administrator, authorization, payroll, accounts receivable, user rights, deleting a user, user rights report
Did you find it helpful? Yes No
Send feedback