This guide covers the use of the supplier listing, including how to search and filter suppliers, edit supplier information, and manage supplier groups in the Netvisor system. The guide also includes information on checking the prepayment register.
CONTENTS
- Supplier listing and access rights to view management
- Free search from vendor register
- Advanced search
- Select visible fields in the listing
- Select action button
- Supplier group management
- Prepayment register
Supplier listing and access rights to view management
The supplier listing can be found: Purchases > Suppliers > Supplier listing.
- You can access the view if you have at least read rights to supplier management and read rights to basic functions of accounts payable.
- Edit supplier information only if you have edit rights to supplier management.
Free search from vendor register

With the free search in the vendor list, you can search for supplier information using the following details:
- name
- business id
- supplier code
- address details
- Enter the supplier name, business id, supplier code or address details in the search field.
- If you wish, enter only part of the supplier name, in which case the system searches all fields where this name is mentioned.
- Leave the search field empty and press the Search button if you want to retrieve all company suppliers.
- Select the "All suppliers" link if you want to display all suppliers created in the system.
- From the view, you can also access supplier group management or adding a new supplier.
- Refine the search from the dropdown menu on the right side of the search field.
- Select one or more search terms from the dropdown menu, after which suppliers matching the search will be listed.
- Note that the search criteria are included in the search only when the search window is open.
- Close the search window if you want to use the basic search without separate search factors.

Advanced search
With the advanced search, you can search for suppliers using the following information:
- Comment
- Country
- Payment term
- Payment prohibition, meaning you can search for suppliers with a payment prohibition.
- Default accounting targets
- Default account
- Address
- Status, meaning whether the supplier is selected as active or passive
- Supplier, meaning you can search by supplier name
- Supplier group
- Open the advanced search in the supplier listing.
- Select the desired search fields, such as country, payment term, payment prohibition or supplier group.
- Enter the search criteria and run the search to list the suppliers that match the criteria.
- Save the search for yourself with a desired name if you want to use the same search later.
- Use the saved search as a selection shown next to the advanced search, for example in a search that retrieves all Finnish suppliers.


Suppliers are listed in the view by supplier group. First, the list shows suppliers without any supplier group.
Select visible fields in the listing
- Select the "Show columns" link when you want to define which column information is shown in the search listing.
- Select the desired columns and save the selections, after which they remain in memory during the user's login session.
- Select the Group button if you want to arrange suppliers, for example, based on the supplier group.
- Press the "Update view" button after you have made column or grouping changes so that the changes become visible.
- Select the "Restore defaults" link if you want to restore the view to its default settings and reset the changes made by the user.

- By default, the supplier listing shows a maximum of 500 suppliers per page at a time.
- Move to the next page if the company has more suppliers than are shown on one page.
- Increase the number of search results per page manually if you want to see more suppliers on one page.

- Retrieve suppliers to the listing with the desired search criteria.
- Save the listed suppliers to Excel by selecting the Save as Excel file button.
Select action button
The button has the following functions:
- With the "Change tax rate" function, you can change the tax rate of selected suppliers if the general tax rate changes or it was initially selected incorrectly.
- With the "Update supplier group" function, you can change or add a desired supplier group to suppliers in bulk
- With the "Update payment term" function, you can add or update the payment term in bulk
- With the "Update country" function, you can update the supplier country information in bulk.
-
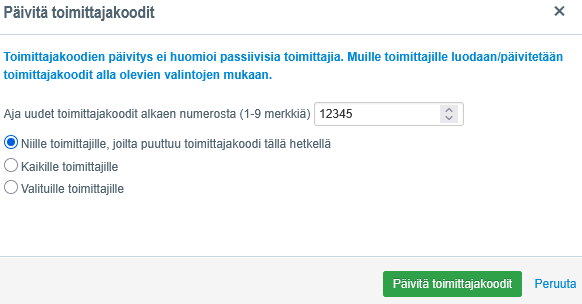
With the "Update supplier codes" function, you can update supplier codes for selected suppliers in bulk from a desired number onwards.
- With the "Update default circulation" function, you can change the default invoice circulation for suppliers in bulk. The circulations must be created first.
- With "Delete supplier," you can delete selected suppliers in bulk. A supplier cannot be deleted if there are purchase invoices behind it or if a purchase has been made for the supplier.
-
With the "Notify billing addresses" function, you can notify selected suppliers of the company's billing addresses. Billing address notifications can be sent via the printing service as a pdf-eLetter or printed locally, for example, for email sending.
- Select from the listing the suppliers for whom you want to perform a mass action.
- From the Select action button, choose the desired function, such as Change tax rate, Update supplier group or Delete supplier.
- Follow the instructions for the function and confirm the changes so that the mass update is carried out.

Supplier group management
For vendor grouping, you can create different vendor groups.
- Open the supplier listing by selecting Purchases > Suppliers > Supplier listing.
- Select the Supplier groups link from the supplier listing.
- Select the Add new supplier group button when you want to add a new group.

- Edit the name of the supplier group in the same view if you want to update the group name.
- Delete the supplier group if you no longer need it.
- Note that if a supplier group is deleted and it still contains suppliers, they will return to the supplier listing section where no supplier group is defined.
Prepayment register
Netvisor shows on the purchase invoice if the supplier is not in the prepayment register. The information is only visible on the purchase invoice. Information is retrieved from YTJ. YTJ information service data is retrieved from the following companies and organizations: limited company, public limited company, housing company, cooperative, insurance company, public insurance company. Information on other company forms is not yet available for the prepayment register. New companies are retrieved from YTJ once a day. For existing companies, information is retrieved every 10 minutes, but due to the number of companies, the information is at most about 2 days old. The program retrieves the prepayment register information even if it is not read in YTJ, in which case the program reads that the company is not in the prepayment register. The information appears on the purchase invoice as follows:

With the help of the guide below, you can handle non-wage compensation for work for a company that is not in the prepayment register.
Non-wage compensation for work / company as an employee.
Frequently asked questions
- How do I open the supplier listing in Netvisor?
Open the supplier listing by selecting Purchases > Suppliers > Supplier listing. - How do I search for a supplier with the free search?
Enter the supplier name, business id, supplier code or address details in the search field and press the Search button. You can also enter only part of the name. - How do I refine the supplier search?
Open the dropdown menu on the right side of the search field or the advanced search and select search criteria such as country, payment term, payment prohibition or supplier group. - How do I select which columns are shown in the supplier listing?
Select the "Show columns" link, choose the desired columns and save the selections. Update the view by pressing the "Update view" button. - How do I make mass changes for suppliers?
Select suppliers from the listing, choose the desired function from the Select action button (for example Change tax rate or Update supplier group) and confirm the changes. - How do I create and manage supplier groups?
Open the supplier listing, select the Supplier groups link and add a new group by selecting Add new supplier group. Edit or delete groups in the same view. - Where can I see whether a supplier is in the prepayment register?
Information on the prepayment register is shown on the purchase invoice. Netvisor retrieves the information from YTJ for the company forms listed in the guide. - Why can't I delete a supplier?
You cannot delete a supplier if there are purchase invoices behind it or if a purchase has been made for the supplier.
Keywords: supplier listing, supplier register, free search, advanced search, supplier groups, supplier group management, Select action button, tax rate, payment term, supplier code, default circulation, prepayment register, YTJ, purchase invoice, Netvisor
Did you find it helpful? Yes No
Send feedback