This guide explains how to import and update product information in Netvisor using CSV files. The guide goes through the requirements, steps, and problem situations related to the import, as well as their solutions.
CONTENTS
General
It is easy to import product information into Netvisor from Excel tables or other systems. There may also be a need to update an existing product register based on an Excel table. The Data import function is used for these situations.
Data import function enables importing product data from another system into Netvisor in CSV (Comma delimited / Luetteloerotin) format. CSV file format is a commonly used transfer file format that is often used when transferring data between different software. You can create a CSV file for example with a spreadsheet program by selecting CSV (Comma delimited / Luetteloerotin) as the file format. Please note that if the file name contains special characters, it may cause an error in data import. If large quantities of products are imported, it is recommended to do the import in parts.
The Data import function is available for all companies without additional costs and the user must have editing authorization in Company menu > Users and roles > click the user name > Sales, products, purchases and financial management > Function specific rights section under Basic data heading for "Basic data management" and "Basic data import". You can find the Data import function in the Netvisor user interface in the Company menu view: Company menu > Data import and export > Data import
The mandatory information in the material are
- Product code (recommended)
- Name
- Price
Fields used in product detail import and update
If compulsory fields are not given, the import cannot be done.
| Imported data | Description |
| Tuotekoodi | Recommended. When updating product information this field is used for allocating data to existing products. Max 50 characters |
| Hinta | Compulsory. In Netvisor the price is imported as net price. Recommended retail price. |
| Nimeke | Compulsory |
| Kotimaan myyntitili | Only account number, e.g. 3000 |
| EU-maiden myyntitili | Only account number, e.g. 3350 |
| EU-maiden ulkopuolinen myyntitili | Only account number, e.g. 3380 |
| Alert limit | |
| Purchase price | |
| Hintatietokerroin 1 | The price group for which the price coefficient is to be added must exist in Netvisor before data import. One coefficient per price group can be imported. |
| Hintatietokerroin 2 | |
| Hintatietokerroin 3 | |
| Hintatietokerroin 4 | |
| Hintatietokerroin 5 | |
| Hintatietokerroin 6 | |
| Hintatietokerroin 7 | |
| Hintatietokerroin 8 | |
| Hintatietokerroin 9 | |
| Hintatietokerroin 10 | |
| Kuvaus | Max 200 characters |
| Provisio | |
| Tullinimike | |
| Product group | Product group has to be created in Netvisor before importing products. Product group is not created automatically. |
| Stock account | |
| Tax rate | E.g. 24 |
| Yksikkö | |
| Yksikköpaino | Weight is imported into Netvisor in grams (g). Has to be integer, no decimals. If one unit weight is given, unit weight has to be given on all rows. For products for which no weight is to be given, the value must be 0. |
Here are the example files for import:
Preparing data
In the CSV transfer file the data of one product needs to be given on its own row and the product information separated into columns. If you title the columns in the Excel file according to the list above, the columns will automatically match the fields used in Netvisor's product card when importing data. Remove the empty columns from the file, i.e. if a column is not used, remove it completely.
Format the table in Excel as text before import to avoid problems with numbers. Handling number series starting with zeros can cause Excel to drop the leading zeros (for example: 00130 -> 130) if the table is handled with default settings.
Do the following:
- Select the whole table
- Click the mouse's second button
- Select "Format cells"
- Select category "Text"

To ensure that special characters are displayed correctly, the file should be saved in CSV (Comma delimited) format before import.

If you are using MAC, the format should be "Windows- comma separated (.csv)" or "Windows Comma Separated (.csv)" to get special characters to display correctly. Newer MAC's may not have these formats and in these cases the import should be done on a Windows workstation.
Steps of data import
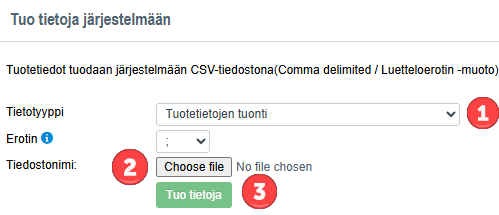
- Open Company menu and select "Data import"
- Select the data type "Tuotetietojen tuonti" (see picture below, point 1) and press "Choose " (2)
- Find the file containing the product data you have saved and press "Submit data" button (3).
- In the next step, the fields of the imported data are linked to the corresponding fields in Netvisor's product register. From the "Open for editing" button at the bottom of the page, an edit page opens where you will find a drop-down menu for each column, from which you select what information the column contains. On this page you can also edit values directly by clicking the value. In the image below, in point 2, the selection Product code is marked as containing the product code.
- If the imported file has column headlines on the first row, by selecting "First row contains column headlines (not imported)" option, these headlines are not imported to Netvisor (3).
- After the linkings have been made, press "Continue to choose relation information" button

- Green colour indicates that the imported information is correct (see picture below, point 1). Red colour indicates an error and the row cannot be imported.
- In the lower right corner of the page (2) you can see in red the number of erroneous fields and in blue the number of editable products. By clicking the red error icon, the selection is directed straight to the erroneous field.
- "Edit" link (3) allows you to see which product card is being referred to (opens in a new tab).

- After updating the fields, two alternative functions are shown in the view:
- "Handle only above editable rows and selected fields" - This function handles only the editable rows, new records are skipped in the process.
- "Continue to choose relation information" - This function imports all new products to the register, and updates the old ones.
- "Handle only above editable rows and selected fields" button updates the existing product information in the product register and the relation information is not set again. After pressing the "Continue to choose relation information" button, the relation information selections are continued. The linked items are:
- Product group
- Unit
- Saleable product
- Stockable product
- Default stock
- Tax rate
- Stock account
- Home country sales bookkeeping account
- EU sales bookkeeping account
- Outside EU sales bookkeeping account
- Price list linkages
- Saleable product (selection affecting all rows)
- Stockable product (selection affecting all rows)
- Default stock (dropdown menu)
- The fields on the CSV file will be updated to existing records automatically. If the automatic allocating has not been done or the field has been empty in the CSV file, you can choose the record (e.g. product group) manually from the dropdown menu. After the selections, press either "Confirm all suggestions" or "Reject all suggestions". After this the customer details are imported by pressing "Save data" button.
Keywords: product information, Netvisor, CSV file, Excel, Data import, Product register
Did you find it helpful? Yes No
Send feedback