This guide provides instructions on how to correct the correct quantity of a product in stock management in different situations, such as retrospective inventory or changes in the current stock balance. The guide includes step-by-step instructions on inventory mass operations, inventory by shelf location, and utilizing the stock inventory list.
Netvisor has a 2-hour timeout. If you inventory large quantities, divide the work into several batches. If the view has not been saved for two hours, the program will terminate the use in the background. You can extend the time period by performing actions on another tab, such as retrieving a view, so that the timeout does not occur.
The inventory entry in stock management can be used to correct the correct quantity of a product in stock management.
- Retrospective inventory
- Change/reset of current stock balance
- Inventory mass operations
- Inventory by shelf location
- Stock inventory list report
Retrospective inventory
The inventory entry view by default records the entry for the day the inventory is made. The date can be changed in the inventory date field so that the inventory entry occurs on the selected day.

In the inventory entry, set the correct quantity to appear for the correct stock. If the value is also incorrect, it is recommended to proceed as follows:
- First inventory the product to zero on the desired day.
- Check that the product no longer has a value.
- Make a new inventory entry with the correct value and quantity for the product.
When the quantities are correct per stock, press the save changes button. This takes you to the stock report, where the change made for the respective products is visible. The delivery date field will have the day given as the inventory date.
To perform a retrospective inventory, proceed as follows:
- Select Stock reports > Inventory report > Stock inventory list.
- Enable the extended search.
- Search for the stock situation up to the desired day (in the example, the situation is searched up to the end of 2023 and the start date is left blank).

From the report, you can see how many products were in stock at the end of the year. If the inventory was made up to the end of the year, the report can be printed and the inventoried quantity can be manually marked for those products that had the correct inventoried quantity in stock.
If the retrospective inventory entry is made manually with a manual stock entry, proceed as follows:
- Calculate the difference between the current stock quantity and the end-of-year quantity per product.
- Select Create new > Stock transaction > Inventory.
- Set the delivery date to the desired day, e.g., the last day of the year.
- Enter the calculated difference quantity for the product, the correct stock, and the purchase price.
Example: If there were -5 in stock at the end of the year and the value is to be reset, make an inventory entry with the quantity 5 for the correct stock and set the purchase price correctly. Set the delivery date to 31.12.2023. This way, the stock is reset to zero at the end of the year, but the current stock quantity may differ from zero if the product has been purchased or sold after the end of the year.
The delivery date of the inventory can be changed at the point when the stock row is formed. Then edit the delivery date field to the desired one.
Change/reset of current stock balance
Before making the inventory, ensure that the product has the correct purchase price.
The inventory entry can be made through the product listing process basket. Inventory cannot be made for a product that is not stockable. Proceed as follows:
- Open Product listing.
- Search for the desired product or products.
- Check the products you want to inventory.
- At the bottom of the screen, select add selected to process basket.

From the menu that opens next to the process basket, select:
- Perform for products > Inventory

The view that opens shows the stocks created in Netvisor and how much of the product is in the respective stock. From this view, the quantity of the product can be corrected per stock.
If you do not want to handle all existing stocks, you can select the button Select stocks to be handled to bring those stocks visible for inventory entry.

Printable format button creates a field ________ after the product quantity per stock row. The view can be printed by pressing the printer icon in Netvisor. The printout can be provided to the warehouse staff, who will manually mark the correct quantity of products on the form. The inventory entry can then be made based on the correct quantity per stock marked on the form.
Below is a view by stock, showing how many pieces of the product are in each stock. The summary section calculates the products together. The meaning of the fields:
- In stock: total quantity of products in different stocks
- Reserved: quantity for which orders have been placed that have not yet been invoiced
- Ordered: quantity ordered with purchase orders
- Purchase price: the product’s purchase price on the product card
- Average price: the stock’s average price for the product


In inventory, you can update the unit price of the desired product if it is different from the product’s average price and mark it as the product’s purchase price. If desired, the average price can also be reset if you want to reset the stock balance and values of the desired product.
Additionally, the Inventory function can, if necessary, update the number of free links of purchases preceding the inventory to the current level if the company has a batch-based stock valuation method in use.
Below is an example of the initial situation: the product “Test product 1” has 37 pcs without stock and 20 pcs in the stock “Unit 1”.

If the correct situation is that there should be no product without stock and there should be 50 pcs of the product in the stock “Unit 1”, change the quantities in the inventory entry as shown in the image below. At the same time, change the unit price of the product to 1.5 euros and set it as the product’s purchase price.

Then press the save changes button.
This automatically creates stock entries for the products. The transaction type is Inventory (unless the stock transaction type has been changed) and the status is handled. The delivery date will be the day the inventory is made. The Specification field will show what the original quantity of the product was and why this changed during the inventory entry.
Two stock rows were created because it was a change in the balances of two different stocks.

Inventory mass operations
Products can also be updated in bulk to the desired stock. Below is an example of a situation where you want 10 products for all products “not default stock” and 30 products for the stock “Unit 1”. Enter this information in the top row.

Press the green downward arrow at the end of the row. This updates the changes entered on the row to all product rows in the process basket. The red square at the end of the row would remove the product row from the process basket.

When changes are made in bulk, they are updated to each product row in the process basket. Corresponding stock entries are created in the background.

Inventory by shelf location
The process basket does not show the shelf location for products. If you inventory a product that has a default stock and shelf location defined, the program will inventory the new quantity directly to the specified shelf location and reset any old shelf location for the respective stock.
If a default shelf location is not defined for the product, but you want a shelf location for the new inventoried row, the desired shelf location must be manually corrected in the stock row formed after the inventory.
If the product is on multiple shelf locations and these should be corrected to the default shelf location in the future (in the example, the products do not have batch processing enabled):
- A few shelf locations are negative.
- There are 2 products in total in stock.
- The default shelf location for the product is A15.
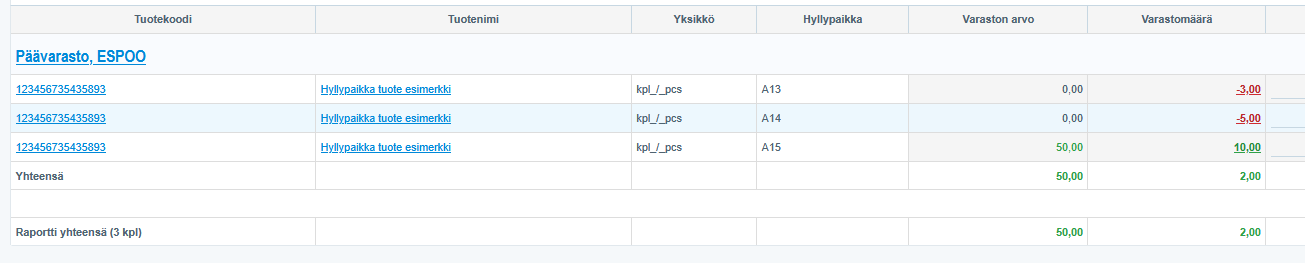
Direct inventory does not correct this, as it only updates the default shelf location.
Make manual entries as follows:
- Select Inventory as the manual stock transaction.
- Enter the quantity +3 for shelf location A13.
- In the entry, manually change the shelf location field to A13.
- Make a corresponding entry with the quantity +5 for shelf location A14 and change the shelf location to A14.

Do the same for shelf location A14.
After this, the old shelf locations are at zero, but the total stock quantity has increased.
If the default shelf location also needs to be corrected, you can do it in the same way with a manual inventory entry or use inventory through the product list via the process basket and correct the desired quantity there. This updates the default shelf location information at the same time.

Stock inventory list report
The stock reports include a stock inventory list that can be used as an aid before making an inventory entry. The report shows the stock quantity of products per selected stock.
If this report is printed, for example, for the warehouse manager, they can go through the products and record the correct quantity of products in the Inventoried quantity field. Then the inventory entry can be made based on this information.
The stock reports have more detailed instructions on their own help page.

Frequently asked questions
Question: How do I correct the quantity of a product retrospectively to a specific day?
Answer: First retrieve the stock situation up to the desired day from stock reports (inventory report and stock inventory list). Calculate the difference between the current stock quantity and the quantity on the desired day and make a manual stock entry of the type Inventory for the selected delivery date. If necessary, first inventory the product to zero and then make a new inventory entry with the correct quantity and value.
Question: How do I change or reset the current stock balance?
Answer: Open Product listing, add the products to the process basket and select Perform for products > Inventory. Correct the stock-specific quantities in the inventory entry view and save the changes. This creates an automatic stock entry that updates the stock balance.
Question: Can I inventory several products at once?
Answer: Yes. In the process basket, you can enter the desired quantities on the top row and use the green downward arrow so that the same quantities are updated for all products in the process basket. Saving creates stock entries for all rows.
Question: How do I inventory products by shelf location?
Answer: If the product has a default stock and shelf location, the inventory updates the quantity to this shelf location and resets the old shelf location. If no shelf location is defined or the products are on several shelf locations, make manual inventory entries for the desired shelf locations and correct the shelf location field manually on the stock rows.
Question: How do I use the stock inventory list report to support inventory?
Answer: Open the stock inventory list from stock reports and print the report for the warehouse manager. The warehouse manager marks the correct quantities in the Inventoried quantity field on the report, and the inventory entry is made based on this information.
Keywords: Retrospective inventory, inventory entry, stock management, process basket, stock inventory list, shelf locations
Did you find it helpful? Yes No
Send feedback