This guide provides instructions on the functions of the employer's separate notifications and the monthly view of employer contributions. The guide covers checking the notification, recording deductions, sending, paying, and setting up automation for the separate notification.
CONTENT
- Employer contributions and employer's separate notification monthly view
- 1) Check the basis of calculation
- 2) Record social security contribution deductions
- 3) Preview
- 4) Create voucher and send notification
- 5) Create and pay tax transfer
- Separate notification automation
- Payment
- No payroll situation
- Reported with separate notification
- Zero notification situation
- Annual view
- Marking separate notification as handled
- Correcting separate notification
- Access rights
- Frequently asked questions
Employer's separate notifications report the total amount of employer's health insurance contributions paid monthly and any deductions made from them. Alternatively, you can report the "No payroll" information if the payer belongs to the Tax Administration's employer register and has not paid any wages during the month in question.
Employee-specific information is always reported with payments via earning payment reports.
Employer contributions and employer's separate notification monthly view
Open the view by selecting Payroll > Payroll > Obligations > Employer's separate notifications.
In the monthly view of employer's separate notifications, you can perform the following actions:
- Record deductions from the health insurance contribution
- Create employer contributions voucher
- Send employer's separate notification
- Create employer contributions tax transfer

1) Check the basis of calculation
Before handling the obligation, ensure that all payslips for the month are included. For example, a calculation may still be unpaid in the payment view, and thus not yet visible on the page or included in the calculation.
The basis for calculating employer contributions is all payslips that have been paid and whose payment date is in the selected month. Review paid payslips in the "Paid payslips" table at the bottom of the page.
You cannot manually edit the sums of the separate notification directly on the notification; the information is automatically generated based on payroll data.

Check that withholding tax, tax at source, and employer's health insurance contribution are correct. The total amounts of withholding tax, tax at source, and employer's health insurance contribution are calculated from paid payslips. The percentage of the health insurance contribution is updated automatically in the program annually, from which the program calculates the amount of the contribution.
All salary types for which the insurance handling settings in company-specific salary types have selected "Health insurance contribution" are included in the basis for calculating the employer's health insurance.
If a salary type lacked income type allocation at the time of payroll calculation and you edit the salary type settings after payroll calculation from company-specific salary types, the information will update on the separate notification.

Additionally, the salary type must be included in either the "Cash salary" or "Gross salary" calculation formula.

2) Record social security contribution deductions
You can record deductions in the separate notification by clicking the blue 0.00-link in the Deductions section.

A window opens from the link where deductions are recorded per employee. Proceed as follows:
- Select the employee from the magnifying glass icon.
- Enter the amount to be deducted.
- Add new rows if necessary using the "New row" function.
- Remember to save at the end.
The monthly view only shows the total amount of deductions. However, if you want to check deductions per employee later, click the blue sum-link in the "Deductions" section for a detailed breakdown.
If the separate notification automation is enabled, you can enter deductions in the same way. These will be included in the automation if entered before the automation runs and sends the notification to the income register.
3) Preview
Preview the information going to the voucher from the voucher "Preview" link.

The posting settings for the separate notification define the accounts used in the voucher entries. Define the accounts as follows:
- Tax account: Select Financial management > Settings > Bookkeeping settings > Bookkeeping and obligations settings > Accounts used in default postings > Tax account.
- Social security contribution postings: Define postings in payroll settings by selecting Payroll > Settings > Payroll settings > Employer's health insurance contribution bookkeeping accounts.
- Withholding tax debt posting: Set the withholding tax debt posting in the salary type credit posting settings by selecting Payroll > Payroll > Salary model management > Company-specific salary types > Withholding tax > Bookkeeping settings.
4) Create voucher and send notification
The voucher date is offered by default as the last day of the selected month. Press the green button, which simultaneously creates the voucher and the separate notification and sends the notification to the income register.

The voucher is now created in bookkeeping, and the notification is created and sent to the income register.
5) Create and pay tax transfer
Creating the voucher and sending the notification activates the creation of the tax transfer.

You can create one or more bank transfers. Enter the information and create the bank transfer.
- Due date: Check that the due date is correct.
- Debit bank account: Select from which account the tax transfer will be paid.
- Amount to be paid: Check that the amount to be paid is correct.
- The calculation shows how the amount to be paid is formed. The formula is withholding tax + tax at source + health insurance contribution - deductions = amount to be paid.
Separate notification automation
You can choose to automate the creation and sending of the separate notification. If the separate notification has already been created manually, the automation will not create another notification on top.
Here's how to enable automation:
Go to Payroll settings > Automation settings > Separate notification.
Enable automation from the "Separate notification" section by selecting "On" and add the contact information to be transmitted to the income register.
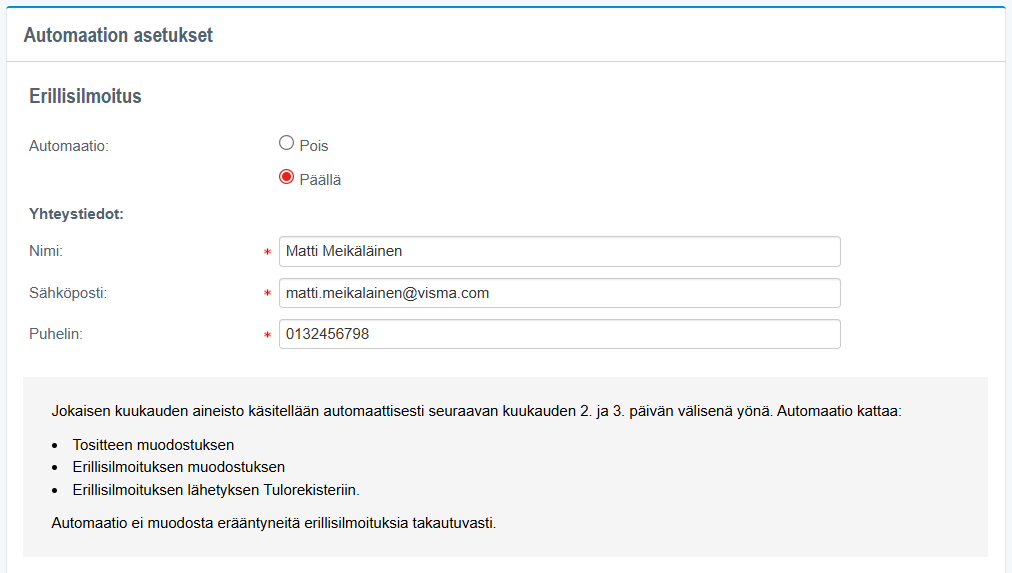
When automation is on, it handles the following steps:
- Create the separate notification.
- Send the separate notification to the income register.
- Create the voucher.
The material for each month is automatically processed during the night between the 2nd and 3rd day of the following month, with the previous month's data.
You can also choose to automate the creation of the employer contributions tax transfer from the automation settings.
Go to Payroll settings > Automation settings > Tax transfer.
Enable automatic creation from the "Tax transfer" section by selecting "On" and choose the bank account to be used for paying the tax transfer.
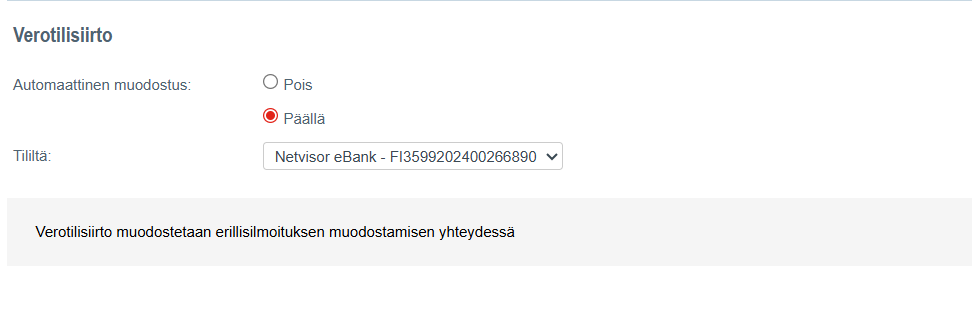
When automatic creation of the tax transfer is enabled, the tax transfer is created in conjunction with the creation of the separate notification. If the tax transfer has already been created manually, the automation will not create another tax transfer on top.
Please note that although the creation of the tax transfer works with automation, it does not automatically proceed to payment.
Payment
If you have the right to pay bank transfers, select the default action "Create and proceed to payment" during the bank transfer creation phase, which will take you directly to the payment view to pay the bank transfer you just created.
You can also just create the bank transfer, in which case it waits for payment in the bank transfer view. Open the view by selecting Purchases > Bank transfers > Open and paid bank transfers.
If the tax transfer automation is enabled, Netvisor has automatically created the bank transfer in conjunction with the creation of the separate notification. In this case, you can proceed directly to pay the bank transfer in question.
All tax transfers created through the view are visible under their own table in the bank transfer section.
No payroll situation
If there is no payroll for the month, report the "No payroll" information to the income register. The program automatically recognizes the situation. The notification shows the "No payroll" information. Create the voucher and send the notification as usual.

No payroll information can be reported in advance for several months. Change the month and create the voucher, send the notification, and create the tax transfer.
- Select the correct year and month: Since no payroll and thus no payslips have been paid in the selected month, the program understands that it is a "No payroll" situation.
- Press the green "Create voucher and send notification to the income register" button.
Reported with separate notification
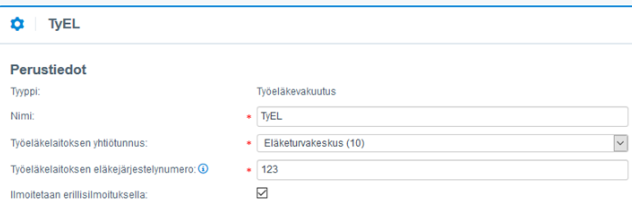
The settlement point settings include the option "Reported with separate notification", which is selected by default. This setting allows the reporting of TyEL insurance company information with the separate notification for months from which no earning payment report is generated. If earning payment reports have been generated for the month, the option automatically does not report pension insurance information with the separate notification even if the option is enabled, as the information is already reported with earning payment reports.
You can view and edit the settlement point settings by selecting Payroll > Payroll > Obligations > Settlements > Go to settlement point settings > Open the desired settlement point in edit mode by clicking the pencil icon at the end of the row.
Zero notification situation
If no salary has been paid in the month, but tax-free expense reimbursements have been paid, it is a so-called "zero information notification" situation. Such a situation must also be reported to the income register. The program automatically recognizes the situation.
The notification shows the "(Zero information notification)" information. Create the voucher and send the notification as usual.

Annual view
Go to separate notifications by selecting Payroll > Payroll > Obligations > Employer's separate notifications. You can choose to display the entire year instead of the month from the menu, and after updating the view, you will see a summary for the selected year at the monthly level for vouchers, notifications, and bank transfers. The actual handling of separate notifications takes place in the monthly view, which you can easily access from the list of months (e.g., May 2019 in the image).

Marking separate notification as handled
If the separate notification is not paid from Netvisor, mark the separate notification as handled by selecting Payroll > Payroll > Separate notifications > Month: Whole year > Update view.
First create the separate notification and bookkeeping voucher, after which you can mark the notification as handled. You can invalidate the created bookkeeping voucher from bookkeeping.

When the separate notification is marked as handled, the Obligations widget in the Notification view no longer alerts about uncreated separate notifications.


Correcting separate notification
If the separate notification needs to be corrected, ensure that the status of the original separate notification is "In the income register".

When the status of the separate notification is "In the income register", click "Invalidate voucher", which will invalidate the voucher created from the separate notification in bookkeeping.

Once you have pressed the "Invalidate voucher" button, the green "Create voucher and send replacement notification to the income register" button is activated.
 Clicking this button creates a new bookkeeping voucher and replacement separate notification in cases where additional payslips have been calculated for the same payroll month after the first separate notification was sent and the information needs to be updated.
If the separate notification needs to be corrected in other situations, open the notification in edit mode by clicking "Show notification" > Make notification > Create replacement notification. Make the edits, save, and send the notification.
Access rights
Access to employer's separate notifications requires the payroll function-specific "edit rights" for "Monthly obligations". Additionally, the Payroll accountant role (P) is required because payroll information is displayed in the view. To create the separate notification bank transfer, "edit rights" for "Accounts payable > Payment" are needed from the "Sales, products, purchases, and financial management" section function-specific rights. To pay the tax transfer, the "Sales and accounts payable" rights must be checked in the sections "Invoice and payroll payer" and "Bank transfer payer".
Frequently asked questions
How do I send the separate notification?
The employer's separate notification is sent from Payroll > Payroll > Separate notifications > Filter to display the desired target month and year. Before sending the notification, we recommend checking that the notification details are correct. Once the details have been checked, you can send the separate notification and create a bookkeeping voucher by clicking the option "Create voucher and send notification to the income register.
How do I correct the separate notification?
If the separate notification needs to be corrected, the status of the original separate notification must be "In the income register." When the status of the separate notification is "In the income register," clicking the "Invalidate voucher" button invalidates the voucher created from the separate notification in bookkeeping. Once the "Invalidate voucher" button has been pressed, the green "Create voucher and send replacement notification to the income register" button is activated. Clicking this button creates a new bookkeeping voucher and replacement separate notification in cases where additional payslips have been calculated for the same payroll month after the first separate notification was sent and the information needs to be updated.
If the separate notification needs to be corrected in other situations, open the notification in edit mode by clicking "Show notification" > Make notification > Create replacement notification. Make the edits, save, and send the notification.
I already created the voucher and sent the notification. Now more calculations have come for the month. What do I do?
If the voucher and notification have been made and more paid payslips have been added for the month, the information on paid payslips does not match the voucher (nor usually the notification). Triangles indicate this.
To update the voucher and notification, proceed as follows:
- Invalidate the voucher from the red Invalidate voucher button.
- Press the green "Create voucher and send notification" button again.
- Create (and proceed to pay) the bank transfer, for which the amount to be paid remains after the recent changes.
Now the information on paid payslips matches the voucher and notification, and the triangles are no longer visible.
There are orange triangles visible in the view, what is this about?
See the answer to the question: "I already created the voucher and sent the notification. Now more calculations have come for the month. What do I do?"
Can I pay the tax transfer in parts?
You can technically create as many bank transfers from the payment as you want. Enter the information for the bank transfer to be created, edit the amount, and create the bank transfer. (Select the option under the creation button that does not take you to the payment view, so you can create as many consecutive bank transfers as needed.) Created bank transfers are visible in their own table under the bank transfer creation function.
Why can't I create a voucher?
Creating a voucher is blocked for a closed period. Check the lock in payroll settings and VAT lock.
User guide: Payroll locks
Can the separate notification be created quarterly?
It is not possible to create separate notifications quarterly from Netvisor. Separate notifications are created monthly, but payment and notification can then be done quarterly for all notifications.
Keywords: employer's separate notification, employer contribution, income register, health insurance contribution, tax transfer, Netvisor
Did you find it helpful? Yes No
Send feedback