This guide covers the travel expense report processing process, which includes the acknowledgement, possible factual verification, approval, and payment of the travel expense report. The process defines the approver and factual verifier from the company hierarchy. Travel and expense reports can be paid directly from Netvisor or during payroll processing.
CONTENTS
- Travel and expense report circulation and processing process
- User rights
- Notification view rights
- Creating a new travel expense report
- Acknowledgement of travel and expense report
- Factual verification and rejection during factual verification
- Rejection during factual verification
- Approval and rejection
- Approval
- Rejection
- Payment and earning payment report
- Example of income type allocation:
- Payment from Netvisor during payroll processing
- Payment in the payment view
- Travel and expense report paid through another system and marked as paid in Netvisor
- Paid travel and expense reports
- Accounting and receipts
- Frequently asked questions
Travel and expense report circulation and processing process
The approval cycle of travel expense reports refers to the journey of expense lines from entry to payment.

- Add a new travel and expense report, save it, and finally acknowledge. The acknowledged travel and expense report moves to factual verification or approval.
- Check and, if necessary, edit the travel and expense report (supervisor). Factually verify and approve the travel expense report. The approved travel expense report moves to the payment phase. Approve the travel expense report for payment during payroll processing or approve and transfer it directly to payment.
- Pay the approved travel expense report during payroll processing. Approved travel expense reports appear on the payroll statement "Check selected payroll bases" phase. Under the heading "Travel and expense entries", approved travel expense reports are shown, which are by default selected for payment on the payroll statement. Acknowledged travel expense reports are also visible. You can approve and select them for payment on the payroll statement, but they are not selected by default.
If you do not want to pay the travel expense report on the generated payroll statement, remove the check from the expense line and select "Save". The approved travel expense line then returns to acknowledged status. Factually verify and approve the expense line again for payment.
When the expense line is selected for payment on the payroll statement, it appears in the payroll statement line details.
Examine the details of the expense line generated from the travel expense report on the payroll statement "Working hours, travel, and absences" tab. Expense lines added manually to the payroll statement do not appear in the travel expense report details.
Remove the expense line if necessary from the red cross if it is not intended to be paid on the payroll statement. When you remove the selection of the expense line and save the information, the expense line returns to unpaid status on the "Open travel and expense reports" page, and the previous approval mark remains visible on the travel expense report expense line.
- "Approve and transfer to payment" transfers the travel expense report to the "Pay travel and expense reports" page. Transfer the travel expense report to payment, and the charge is deducted from the company's account. Only a user with payment rights can transfer the expense report to payment.

- When the travel and expense report is paid, a receipt is immediately generated for the directly paid travel expense report in the accounting according to the payment date.
For travel and expense report lines paid through the payroll statement, the accounting entries come to the payroll statement receipt according to the payroll statement receipt entry date.
User rights
The user rights and settings required for processing travel and expense reports are described separately on their own page, which goes through the effects of user rights and roles, as well as building the company hierarchy for the approver.
Travel expense reports can only be created for a person who is an employee in the company, and the employee must have the Travel service enabled.
Employees can be given the "Employee" profile from payroll user rights, which automatically provides function-specific rights for time recording and creating travel expense reports.
The "Employee" profile includes function-specific rights for time management and employee management. Without approval rights granted from the company hierarchy, the employee only sees their own working time and travel expense report information.

Notification view rights
In the Netvisor user interface, it is possible to notify the approver of unreviewed and unapproved travel expense reports.
Mass factual verification and approval of travel expense reports occur in Travel > Approve travel and expense reports.
Your own travel expense reports to be factually verified and approved can be found most easily through the notification view, from which you can access the mass processing view of travel expense report lines.

Travel expense report lines can be processed in bulk from the mass processing view or one travel expense report line at a time by drilling down into the travel expense report.
Creating a new travel expense report
The circulation of a travel expense report begins with creating the travel expense report. A user can create a new travel expense report through different routes:
From the "Create new" menu or from the user interface menu under Travel > New travel expense report.
The travel expense report can also be conveniently created directly via Mobile.
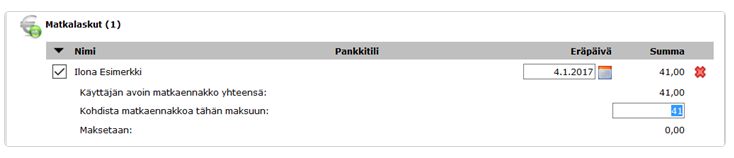
Acknowledgement of travel and expense report
Acknowledge created travel expense report lines (1) so that they move to be factually verified and approved.
- Select the completed lines you want to acknowledge.
- Transfer them to approval with the acknowledgement button.
- Remove an incomplete line if necessary from the red cross at the end of the line.

Factual verification and rejection during factual verification
If the factual verification phase is enabled in Payroll settings, the expense lines are factually verified after acknowledgement.

If the company is small and the same person factually verifies and approves travel expense reports, the factual verification phase may be unnecessary and does not need to be enabled, in which case the lines move directly from acknowledgement to approval.
Select lines that are in order and mark them as factually verified (2) with the factual verification button.

The name of the factual verifier and the time of factual verification remain visible under the line in the log.

Rejection during factual verification
Return the expense line of a travel expense report back to the previous phase as open by rejecting it from the red arrow at the end of the expense line. After this, acknowledge the expense line of the travel expense report again to be factually verified again.

Approval and rejection
From the factual verification, the expense line of the travel expense report moves to the selected approver for approval. The approver can be defined behind the employee's information, according to the company hierarchy, or overridden in the travel expense report information.
Approval
Approve the expense lines after factual verification. Only approved expense lines can be transferred to payment or paid during payroll processing. You can choose to transfer expense lines directly to the "Pay travel and expense reports" page during approval.

- Choose "Approve selected" button (3) to pay travel expense report lines during payroll processing.
- Select "Approve and transfer selected to payment" button (4) to transfer travel expense reports to the "Pay travel and expense reports" page.
Detailed instructions later in this user guide under Payment.
The name of the approver and the time of approval remain visible under the expense line in the log.
Rejection
Reject the expense line of a travel expense report and return it to the factual verification phase from the red arrow at the end of the expense line. The approval information on the rejected line remains saved.

Payment and earning payment report
Pay travel expense report expense lines from Netvisor either during the payroll statement or with a separate bank transfer. In both cases, an earning payment report is automatically generated for a travel expense report that contains information to be reported to the income register, such as mileage allowances and daily allowances. During the payment phase, there is an option to send the generated earning payment report to the income register.

View the sent notification by selecting Payroll > Payroll processing > Earning payment reports.
User guide: Travel expense reports to the income register

To ensure that earning payment reports are generated correctly, the income type allocations for Netvisor's "Tax-free cost reimbursements" payroll types must be set by selecting Payroll > Payroll processing > Payroll model management > Company-specific payroll types > click on payroll type > income type.
Example of income type allocation:
For the payroll type "Full per diem allowance" the income type 331 Daily allowance is given in the company-specific payroll type settings. In addition, the type of daily allowance is selected from the dropdown menu, in this example, the choice is "Full per diem allowance".

Payment from Netvisor during payroll processing
If you want to pay the travel expense report through payroll processing, select "Approve selected" (3).
- Open the view by selecting Payroll > Payroll processing > Payroll statements and periods.

- Do not transfer the expense line to payment on the "Pay travel and expense reports" page, but leave it in the "Approved" status, so the payroll accountant knows that the line is ready to be paid on the payroll statement.
- Check that the travel expense report appears under the "Unpaid travel expense reports" heading.

In payroll processing, the expense lines of the travel expense report appear in the "Check selected payroll bases" phase.

Check all approved and unpaid travel expense report lines of the employee in payroll processing during the payroll base check. By default, only lines in the "Approved" status are selected for payment on the payroll statement along with the payroll.

Select other expense lines for payment if necessary, in which case their status is directly updated to approved. The selected expense lines are included in the payable amount of the payroll statement and appear in the line details of the payroll statement.
The accounting receipt is generated when the accounting receipt is created in the payroll processing process.
Payment in the payment view
"Approve and transfer selected to payment" option (4) transfers the expense lines of the travel expense report to the "Pay travel and expense reports" page.

If you want to pay the travel expense report expense lines separately from the payroll, approve the lines and then transfer them to payment. Pay the payment from the payment view and not through payroll processing.
Open the view by selecting Travel > Travel and expense reports > Pay travel and expense reports
If the approver also has payment rights, they can approve and transfer the lines to payment without an intermediate step. It may also be that a different person approves and pays travel expense reports, in which case the approver does not even see the payment buttons due to their rights but only handles approval, and another person transfers the lines to payment.

A recipient-specific bank transfer payment is generated from the selected lines, which can be paid in the payment view. If travel expense report lines are selected for the same person from multiple different travel expense reports, they are combined into one payment in the payment process. At the same time as the lines are selected for payment, an accounting receipt is generated from them according to the payment date.
If the program gives an error message "Sending the material failed. Try again later." when selecting "Continue to confirmation view" and "Send to payment," check the company-specific payroll types in payroll model management to ensure that all payroll types have accounting settings for both debit and credit sides.
Check the information by selecting Payroll > Payroll processing > Payroll model management > Company-specific payroll types
Payment fails if accounting settings are missing from payroll types.
Travel and expense report paid through another system and marked as paid in Netvisor
If the travel expense report has already been paid to the employee through another system and instead of payment you want to mark the travel expense report as paid in Netvisor, mark the travel expense report as paid by recording a travel advance of the same amount to the employee through the "Salary and travel advances" section, as the amount of the travel expense report to be acknowledged.
Record the travel advance by selecting Payroll > Payroll processing > Salary and travel advances > Add new salary or travel advance
- Select Type: "Travel advance"
- Select Save and mark as paid

Ensure that the travel expense report to be acknowledged is in the "Travel expense reports awaiting payment" status to be visible on the "Pay travel and expense reports" page.
Access the payment view by selecting Payroll > Payroll processing > Pay salaries or Travel > Travel and expense reports > Pay travel and expense reports
Click the checkbox in front of the employee's name, and the details of the travel advance to be allocated open:

- Allocate the travel advance for the amount of the travel expense report so that the "To be paid" line has a balance of zero.
- Then select the account to be used and "Continue to confirmation view"
- Send the material to the bank normally. No money is transferred to the employee because the payable amount is zero. The payment transaction allocates the travel expense report and travel advance to each other, and the program generates an accounting receipt from the transaction. An earning payment report must be taken care of for the travel expense report to the income register, so even for a travel expense report whose payable amount remains zero after the advance is acknowledged, an earning payment report is generated to be sent to the confirmation view.

Paid travel and expense reports
Finally, the lines appear as paid. Retrieve paid travel expense reports for display through the "Open travel and expense reports" page using the advanced search by selecting paid travel expense reports to be shown.

Accounting and receipts
Travel expense report paid through payroll processing
The accounting receipt is generated when the accounting receipt is created in the payroll processing process for the payroll statement.
Travel expense report transferred to payment
The accounting receipt is generated according to the payment date.
Travel expense report paid elsewhere
The receipt is generated immediately when the zero-sum travel expense report is paid from the payment view by allocating it to the travel advance.
Frequently asked questions
How do I pay the travel expense report?
In Netvisor, a travel or expense report can be paid or marked as paid. The travel or expense report can be paid by attaching travel or expense lines directly to the payroll statement in the "check selected payroll bases" view, or the lines can be transferred directly to the payment view to await payment. The travel expense report can be marked as paid using travel advances.
How do I get the travel expense report paid in payroll processing?
Approve the travel expense report with the "Approve selected" button, but do not transfer it to payment.
What should I do if the travel expense report has already been paid through another method?
Create a travel advance of the same amount and allocate it to the travel expense report in the payment view, leaving the payable amount as zero. Send the material to the bank (0 €) to generate the accounting receipt.
How can I avoid accidentally deleting a travel expense report?
Deleting a travel expense report line and the entire travel expense report requires a separate confirmation. Make sure you select the correct cross when you only want to delete a single line.
Keywords: Travel expense report, account of expenses, approval cycle, factual verification, payment, payroll, Netvisor, travel advance, income register, earning payment report
Did you find it helpful? Yes No
Send feedback