This instructions explains how to invite a new user to Netvisor. Access rights management is described in more detail in the instructions: Users and access rights – adding and management of access rights.
CONTENT
- Access rights management
- Inviting a user (inviter’s process)
- Inviting a user (invitee’s process)
- Frequently asked questions
Access rights management
Add a new user to Netvisor via the invitation process from 1 April 2026 onwards. The invitation verifies the user’s identity with bank authentication and two-factor authentication (email and text message) before the KH user approves the user and adds access rights for them.
If you want to add rights for a user to another Netvisor environment without the invitation process:
- Follow the instructions in Authorizing a user to another company.
- In that case, the invitation process is not needed.
Users with the User administrator role (KH) and/or the Accounting office administrator role (TPK) can invite users to the company.
- The company itself (or the accounting office) is responsible for the correctness and management of access rights.
- Netvisor specialists can change access rights only in exceptional cases.
- In such cases, a written request must be submitted by the administrator of the company’s Netvisor environment or a person with signing rights for the company.
On the Users and roles page, you manage the company’s users:
- Review the users who have been approved for the active company.
- Note that active users, who can log in to the company’s Netvisor environment, are listed first.
- Passive users: their access rights validity period has ended and they cannot log in to the company but will receive the error message “Access rights expired”.
- Change a passive user to active by selecting the user > Edit user login settings > Define access rights validity period.
Make use of the renewed Users and roles view:
- Search for users by roles, name or base company.
- Sort the view by clicking the column names.
Manage invited users in the User invitations view by selecting Company menu > Users and roles > User invitations:
- Review users invited to the company whose invitation process is overdue, the invitation has been sent or the user is waiting for approval.
Manage invitations also in the My Netvisor view by selecting My Netvisor > User invitations:
- Review and manage invited users of all environments where you are a user administrator (KH user).
Note the processing of user data:
- Do not add company-specific personal data for a user, such as name. The user’s personal data is the same in all companies.
- Define contact information (phone number and email) per company if needed.
Inviting a user (inviter’s process)
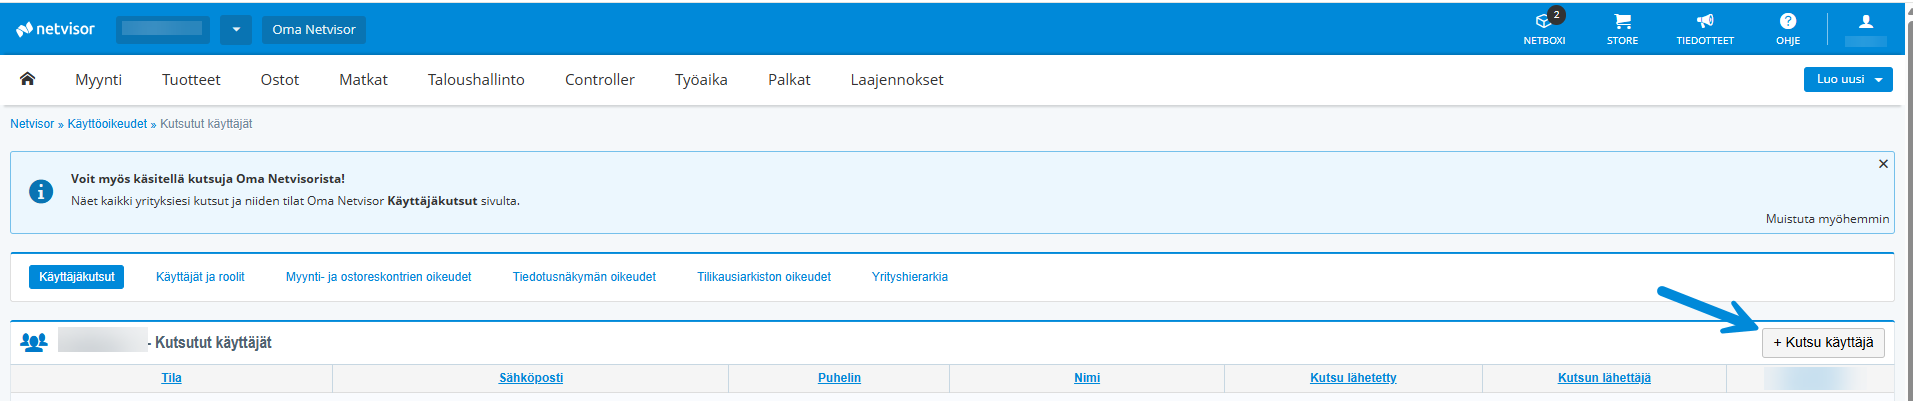
Open the invitation process by selecting Company menu (company name at the top left) > Users and roles.
- In this view, review the environment’s active and passive users.
- Start the invitation process either on the Users and roles tab or on the User invitations tab.
Add a user with the Authenticate to add user function.
- Perform strong authentication to verify the identity of the user administrator.
- Select Netvisor mobile app or bank credentials as the authentication method.

After successful authentication, continue in the view that opens (Users and roles or User invitations, depending on where you authenticated).
- Select “Invite user” to start adding a new user.
- If you want to send the invitation in English, change the language of the Netvisor user interface from the menu that opens behind your own name in the upper right corner before sending the invitation.
- Note that sending invitations in Swedish is not currently possible.
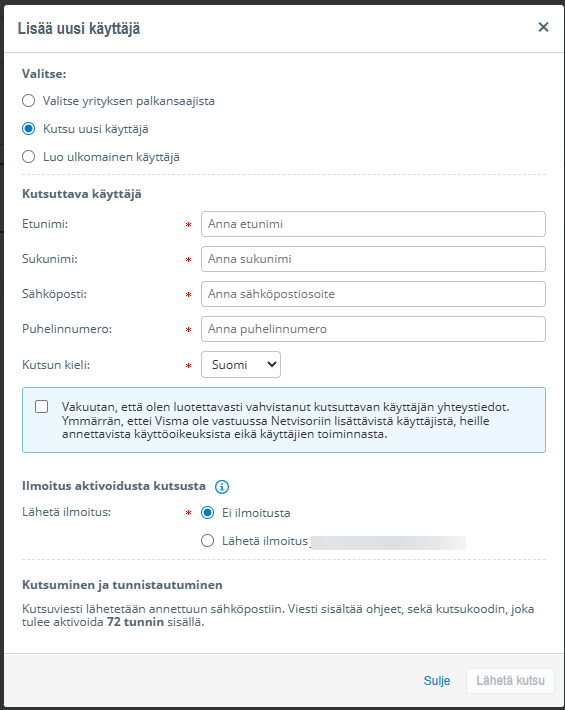
In the window that opens, select how the user is added.
- Add a user with Finnish online bank credentials either:
- by selecting the user from the company’s employees, or
- by selecting Invite new user and entering the user’s name, email and phone number. You can also select the language in which the invitation is sent.
- The invitee’s personal identity code is not needed.
- Select whether you want to receive an email notification when the user has authenticated. The email address is the verified email address specified in your own basic information.
- Follow separate instructions for adding a foreign user: Adding, inviting and logging in a foreign user.
- Add a user with Finnish online bank credentials either:
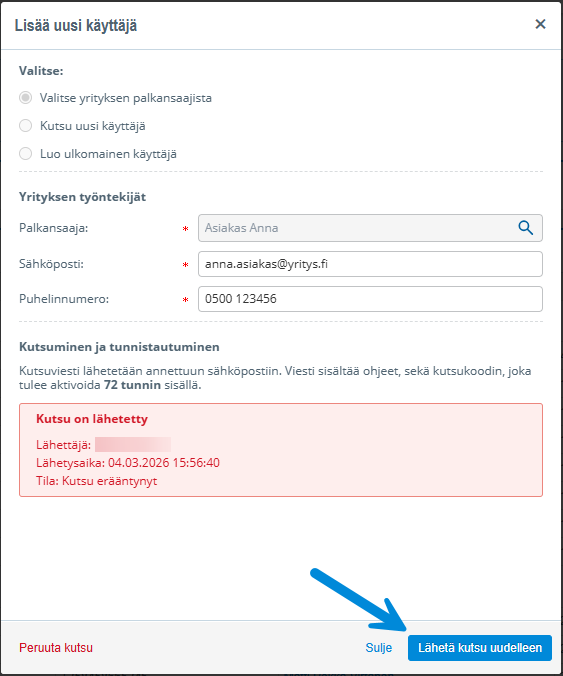
Send the invitation after you have entered the user’s details.
- Select Send invitation.
- Enter an invitation message for the invitee; it will be sent to the email address provided.
- Note that the message contains instructions and an invitation code that must be activated within 72 hours.
- For the user administrator, an overdue invitation is shown in the Netvisor user interface with the status “Invitation overdue”.
- Resend the invitation by clicking the invitee’s name in the view that opens.
- Edit the invitee’s contact information in the same view if needed.
Approve the user when the invitation status is “Waiting for approval” (approval requires the KH role).
- Wait until the user has successfully completed the authentication process, after which the invitation status in the user interface changes to “Waiting for approval”.
- Approve the invited user by clicking the user’s name.
- The invited user can be approved by a different KH user than the one who sent the invitation.
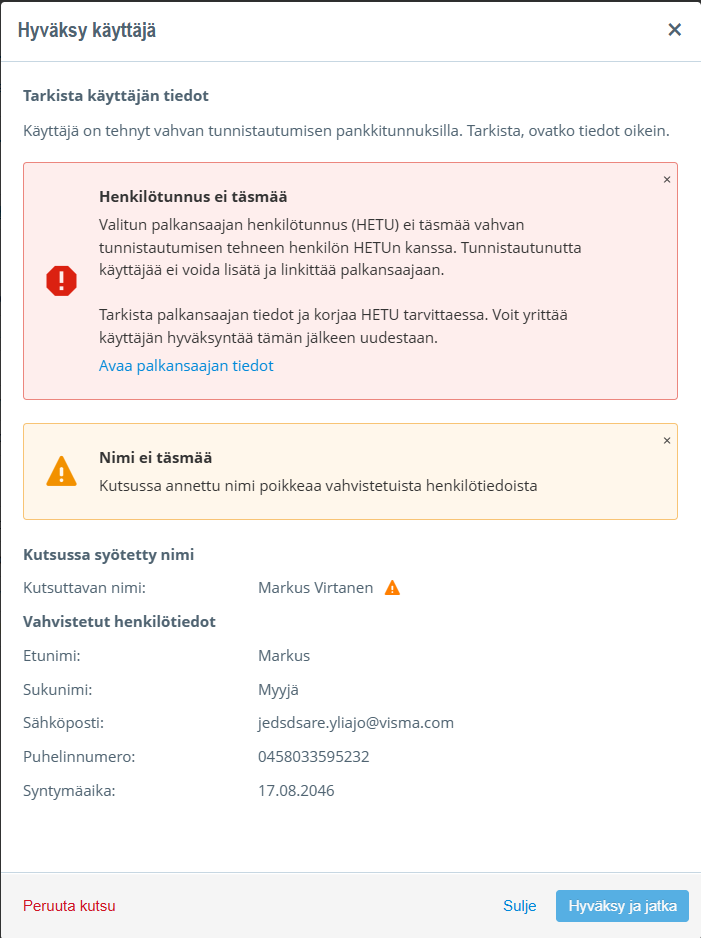
- Check that the invitee’s name matches the information obtained via strong authentication.
- Select Approve and continue if the name information matches.
- If the name information does not match, contact the invitee or a P-role user (if the invitee was added from the company’s employees) to clarify any discrepancies.
- Note that the system allows approving a user even if the name information does not match.
- If the user was added from employees and the personal identity code in the employee list does not match the personal identity code obtained via strong authentication, note that the system will notify about this and approval cannot be completed.
- In that case, check the personal identity code and invite the user again if necessary.
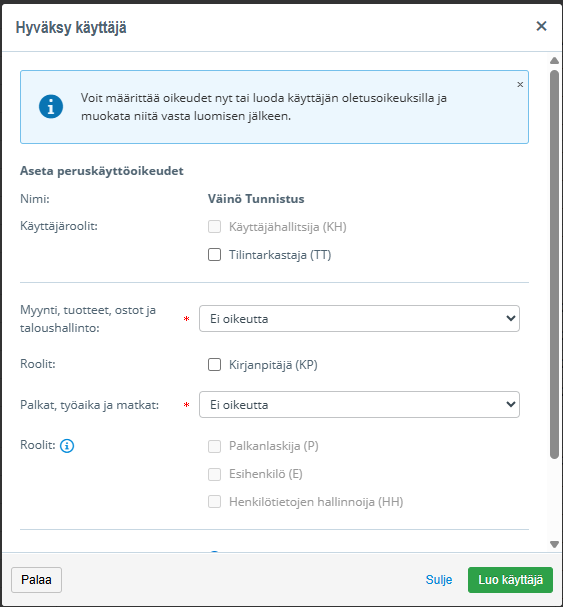
Define the user’s access rights and create the user.
- After approval, define the user’s access rights.
- Change access rights later if needed on the Users and roles page.
- Select Create user after defining the access rights.
- Note that the user is then moved from the User invitations view to the Users and roles view.
- Allow the user to log in to Netvisor: a notification of completed approval is sent to the invited user by email (this feature is planned to be implemented in early May 2026).
Inviting a user (invitee’s process)
Provide the company’s TPK or KH user with the necessary information to start the invitation.
- Make sure that the TPK or KH user has your name, email address and phone number.
Receive an email from Netvisor containing an 8-character confirmation code.
- Note that, for security reasons, there are no direct links in the email.
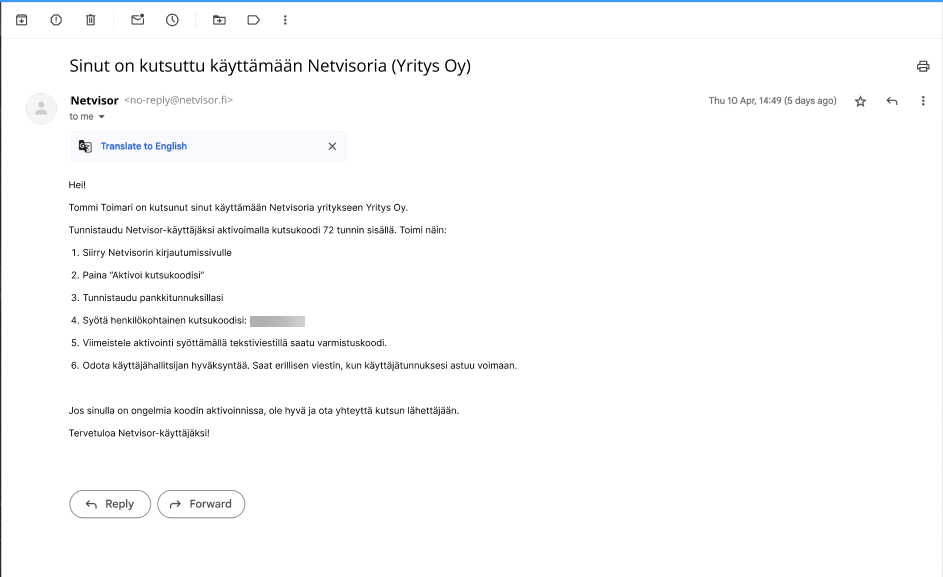
Enter the code received by email on the Netvisor login page.
- Open the address https://login.netvisor.fi/fi in your browser.
- Select Activate your invitation code.
- Authenticate with your online bank credentials.

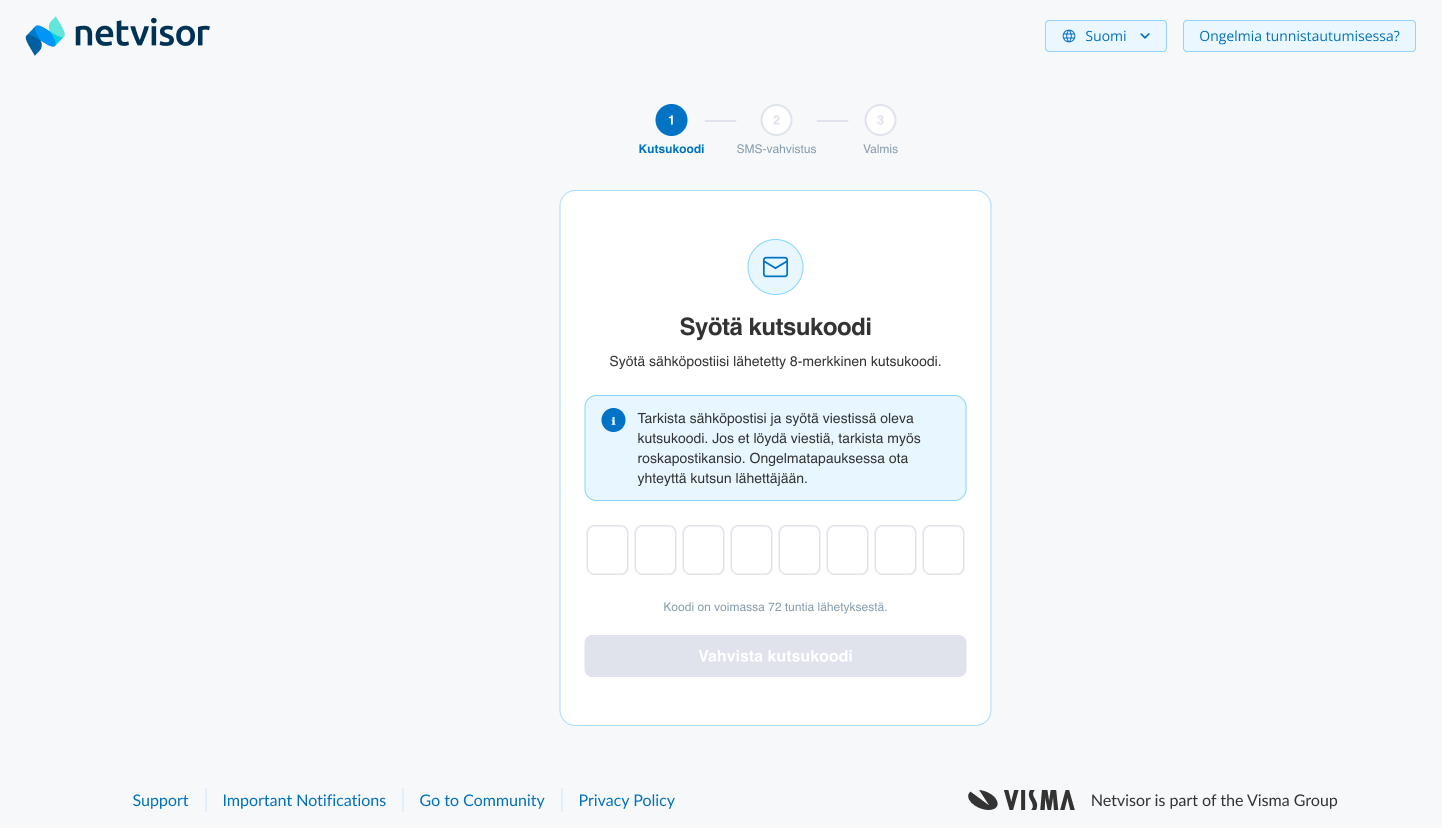
Enter the 8-character invitation code in the view that opens after authentication.
- Note that the code is valid for 72 hours from sending.
- Avoid incorrect entry: if you enter the code incorrectly more than 3 times, the invitation is locked and the user administrator must send a new invitation.
- If the invitation code is overdue, you will be notified of this and the user administrator must start the invitation process from the beginning.
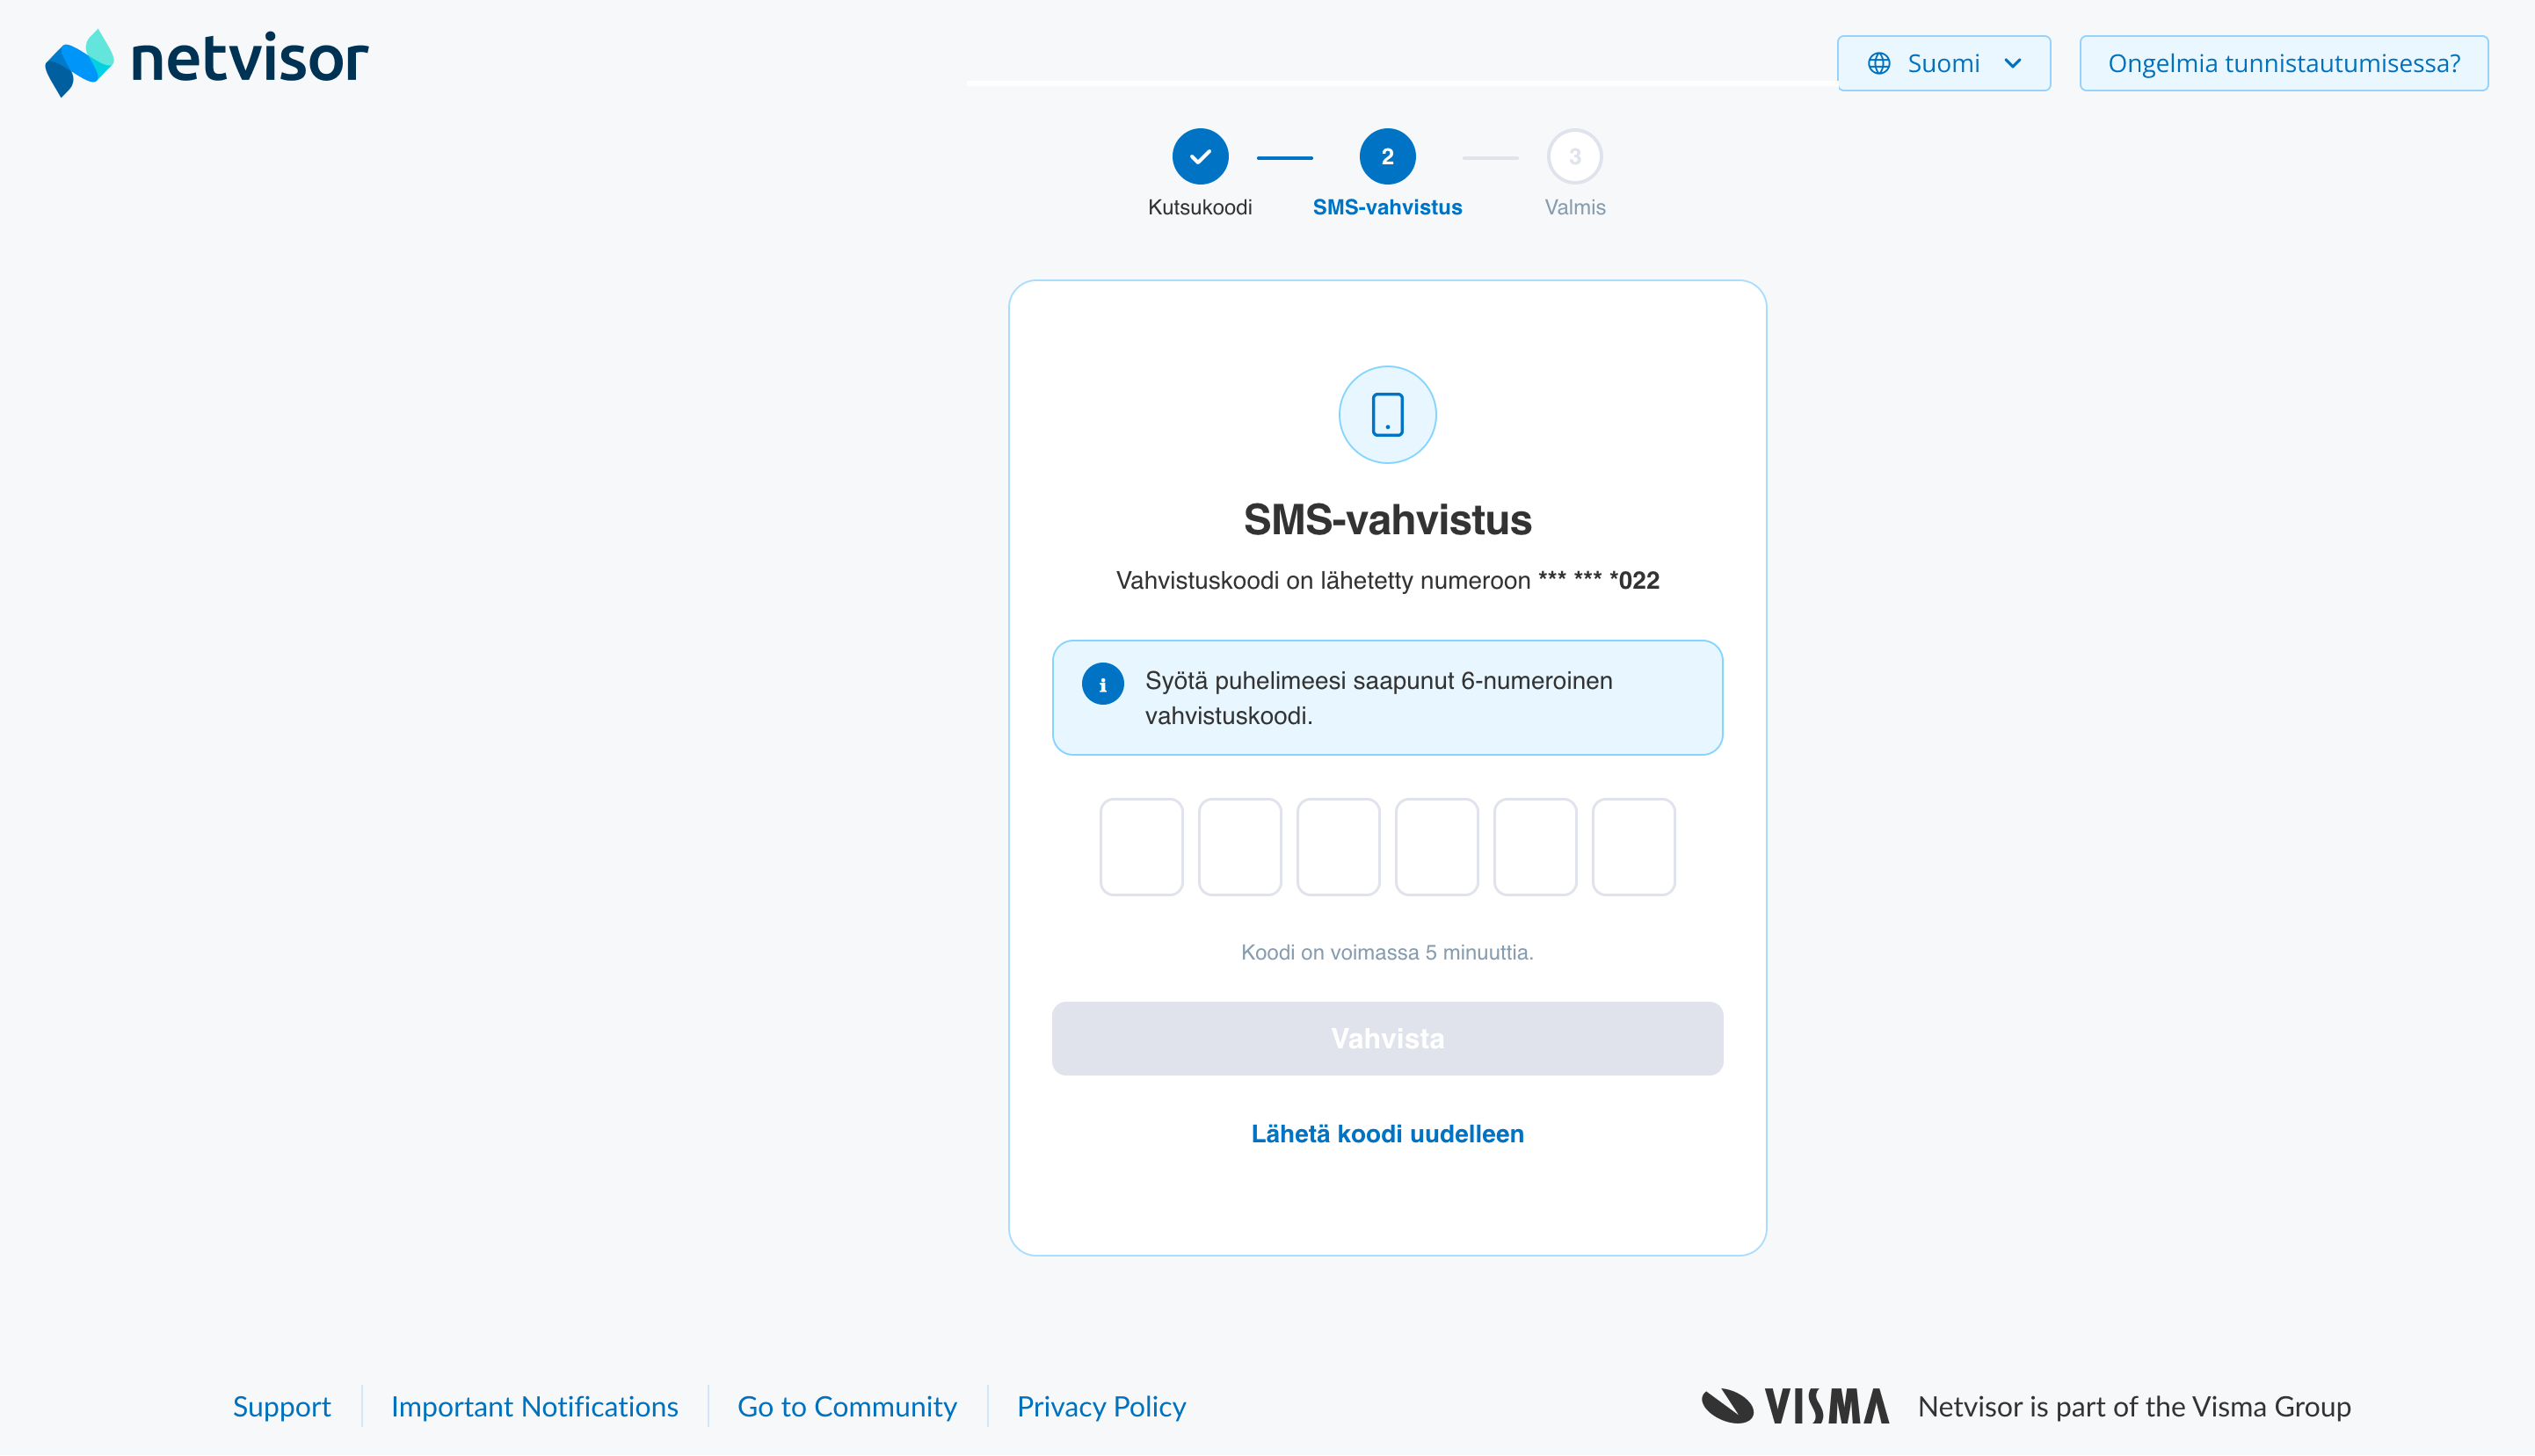
Receive an SMS confirmation when the invitation code has been entered successfully.
- Note that the SMS code is valid for 10 minutes.
- Order the code again if needed, up to three times, if the code does not arrive.
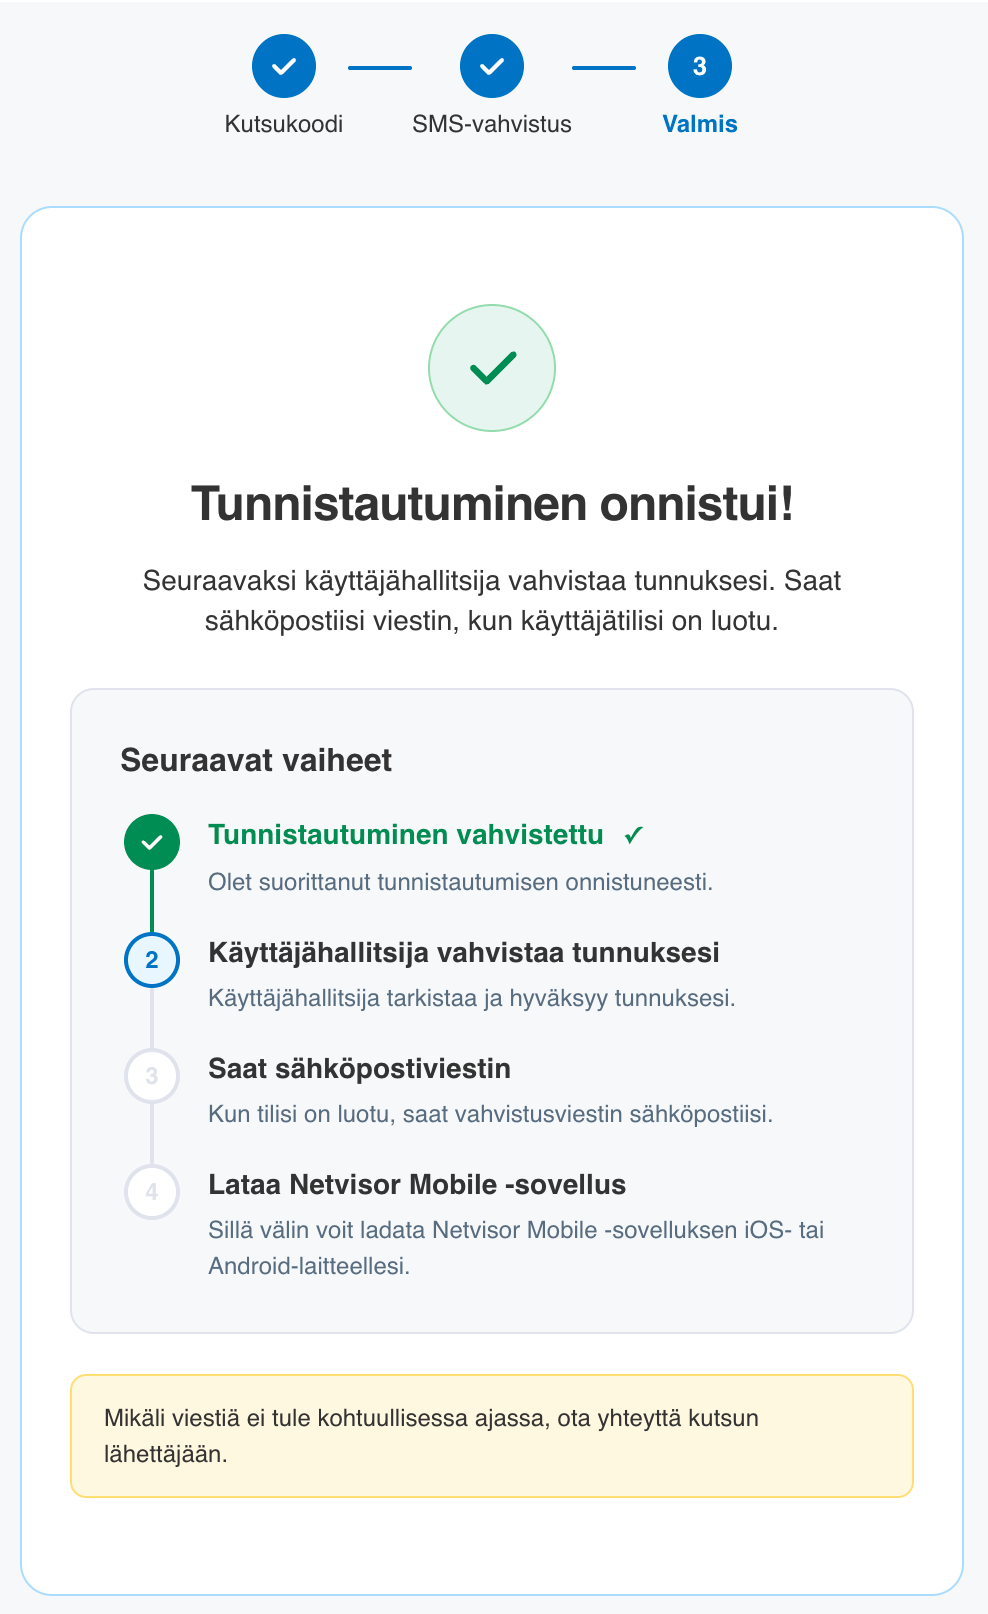
Wait for the company’s user administrator’s approval after the authentication process.
- Complete the authentication process according to the instructions.
- Note that the company’s user administrator (KH user) must still review and approve the user.
- Wait for an email notifying you that the approval has been completed.
- Note that you cannot log in to Netvisor immediately after completing the invitation process.
- Note that Netvisor support cannot approve the user; approval is always done by the user administrator of the company’s Netvisor environment.
Log in to Netvisor after approval.
- Subsequently log in to Netvisor either with the Netvisor mobile app or with your online bank credentials.
Frequently asked questions
The user is not added with a personal identity code; is adding the user secure?
Yes, adding the user is secure. For Finnish users, security is based on three complementary factors:
- Authentication with bank credentials – The user authenticates with their bank credentials, whereby the correct personal data is transmitted to the system. The personal identity code is not handled in the user interface, but it is stored securely in the background system.
- Email confirmation – The invitee proves that they control the email address to which the invitation was sent (8-character code).
- Text message confirmation – The invitee proves that they control the phone number entered by the administrator when sending the invitation (6-digit code).
The invited user does not receive the email
- Check that the email address has been entered correctly.
- Ask the user to check their spam folder and other filters.
- Note that the invitation is sent from the address noreply@netvisor.fi.
- Cancel the invitation and send it again.
- If the invitation still does not reach the user, contact Netvisor support.
The user has been invited with an incorrect email address or phone number
- Open the User invitations view.
- Click the name of the user who was invited with incorrect details.
- Edit the invitee’s details.
- Send a new invitation.
- Note that the code of the previous invitation will no longer be activated even if the user tries to use it.
The invitation has been sent to the wrong user
- Open the User invitations view.
- Click the name of the user who was invited incorrectly.
- Select Cancel invitation.
- Note that the code of the sent invitation will no longer be activated even if the user tries to use it.
How does the user administrator see authenticated invitations waiting for approval?
- Open the User invitations view in My Netvisor.
- Review the user invitations of all companies where you are a user administrator.
- Note that the view shows all invitations that have not yet been cancelled or approved, regardless of which user administrator sent the invitation.
- Note that when the invitation is cancelled or the user is approved and moved to the company’s Users and roles view, the invitation is automatically removed from the User invitations view of My Netvisor.
How quickly can the user log in after authentication?
- Let the user administrator define access rights after the invitation has been confirmed.
- Note that the user can log in as soon as the access rights have been defined.
- The user will receive a notification of the access rights definition by email.
The user’s details change; do they need to be invited again?
- If the user’s personal identity code changes, you must contact Netvisor support.
- Do not invite the user to Netvisor again if the user’s name changes.
- Ask the user to authenticate to Netvisor again using strong authentication after the name change.
Does the change also apply to special groups such as auditors and tax inspectors?
- In future, auditors and tax inspectors are also added by the user administrator.
- If the base company of an auditor or tax inspector needs to be changed, you must contact Netvisor support.
How should I proceed if the invitee is already a Netvisor user in another environment to which I do not have access?
- Invite the user to your own company environment in accordance with the normal invitation process, even if they already have a Netvisor account in another environment.
- Note that the user’s existing Netvisor user account in another environment does not prevent the invitation process from being carried out.
- Note that the invitation process does not require you to have access to the user’s other environment.
Does the user administrator receive a notification about users waiting for approval?
- Note that the user administrator does not receive a separate notification when the invitee has authenticated.
- Review the user invitations of all companies where you are a user administrator in the User invitations view of My Netvisor.
- Make use of the view, which also shows invitations sent by other user administrators.
- Note that the same user administrator does not need to complete the entire process.
I want to add a user to another environment; do they need to go through the invitation process again?
- Do not start the invitation process again if you want to add the user to another environment.
- Add rights for the person to another company where you have a user administrator role.
- Open the user in the Users and roles view.
- Authenticate to add access rights.
- Select Add new access rights.
- Follow more detailed instructions: Authorizing a user to another company.
Can several invitations be sent to the same email address?
- Do not send several active invitations to the same email address.
- Note that the system allows only one active invitation per email address.
- Cancel the previous invitation before sending a new one.
Article keywords
Netvisor, user, inviting a user, user invitation, Users and roles, User invitations, KH user, TPK, access rights, access rights management, strong authentication, bank credentials, Netvisor mobile app, email confirmation, text message confirmation, invitation code, My Netvisor, adding a foreign user, authorizing a user to another company
Did you find it helpful? Yes No
Send feedback