Summary: This instruction describes payslip processing and editing. It covers editing payslip row information, additional information, and the allocation curve, as well as adding and deleting salary type rows. In addition, it presents the payslip processing history, the payroll accountant view, and pay period comparison.
CONTENT
- Payslip processing and editing
- Payslip row information
- Add new salary type row
- Payslip processing history
- Update payslip information
- Update allocation curve
- Return payslip initial values
- Payroll accountant view
- Payslip additional information
- Working hours, travel and absences
- Employee-specific pay period comparison
- Mark selected as processed
- Frequently asked questions
View unprocessed payslips. In unprocessed payslips, the employee's name, payslip editing, salary payment date (for the employee), amount to be paid and change from the previous pay period are displayed, along with a preview of the earning payment report and the status of the earning payment report.
Delete button (red cross) returns the payslip to the beginning at Employees with payslip not yet created.

Payslip processing and editing
- Select Edit.
- View and edit payslip information.

The Edit link opens a window where information editing and calculation occur.
Payslip row information
Select the Payslip row information tab.
- Edit existing payslip rows using the pen/notepad icon.
- Add new rows by selecting Add new salary type row.
Note that a row containing a formula cannot be deleted unless the value has been edited manually.
- Select Delete (red cross) if you have edited the value manually.
- Instead of deleting, the value returns to the formula-based value.
Edit the payslip cost centers and posting until a voucher has been created from the payslip. The payslip does not need to be returned to unprocessed for editing these details.

Add new salary type row
- Select Add new salary row.
- Add missing salary information.
- Set quantity, unit price, specification, accounting accounts, and calculation targets for the new payslip row.

Find all salary types linked to the salary model in the Add new salary type row menu.

Payslip processing history
View the payslip processing history. Each payslip has a processing history, which always records a note when the slip moves forward or backward in the process.

Check the note, timestamp, and any possible comment also for transferring to approval, approving, and rejecting, if salary approval is in use.
- Write comments freely on the slip.
- Save the comment. Unsaved comments disappear if the tab is changed.
Update payslip information
- Select Update payslip information.
- Updates changes in withholding tax if the percentage value has been changed on the tax card.
- Updates insurance calculation if the income types of salary types have been edited in Company-specific salary types after the payslip was created.
Update allocation curve
- Select Update allocation curve. The button takes you to the Allocation curve tab.
- Edit the allocation curve for calculation targets on an employee-specific basis.

Return payslip initial values
- Select Return payslip initial values.
- Delete the salary types added in the payroll process and edit the information to match the employee's basic data.
- Update the changed information to the created earning payment report with this button if the employee's basic data has been updated.
Payroll accountant view
Select Payroll accountant view tab. In addition to previous information, view Income types, Accounting accounts, and Calculation targets processing. Also view fixed salary types.

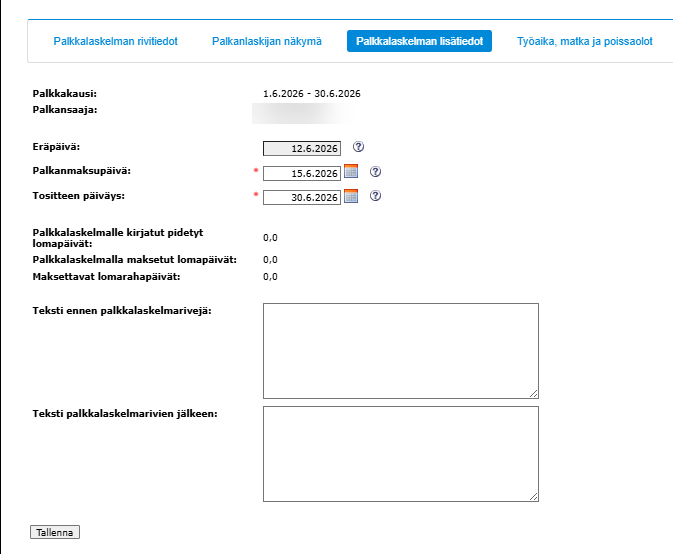
Payslip additional information
- Select Payslip additional information tab.
- Edit payroll dates if necessary.
- Add text to the payslip.
- View the holiday and holiday bonus days to be taken and paid during the pay period.
Working hours, travel and absences
Select Working hours, travel and absences tab. View the working hours, travel expense reports, and absence information affecting the pay period.

If, for example, absences or their pay amounts need to be added to the view, you can do this in Paid absences or Unpaid absences. Existing rows can be edited using the pen icon at the end of the row.
Continue the process when all information has been marked as desired and saved.
- Select Close.

Employee-specific pay period comparison
In the pay comparison window, compare the employee's calculated payslip to previous payslips.

- Select Pay comparison on the payroll process page in the column where the percentage difference from the previous payslip is indicated. The same link is available in all stages of the payroll process.

Mark selected as processed
Continue the payroll process when all payslips are ready.
- Select the payslips to be processed.
- Select Mark selected as processed. The button takes the slips to the printing stage.

Frequently asked questions
How do I edit payslip information?
Select Edit to open a window where you can view and edit payslip information.
Can I delete a salary type row that contains a formula?
A row containing a formula cannot be deleted unless you have edited its value manually. If you have edited the value, Select Delete (red cross), in which case the value returns to the formula-based value.
How do I add a missing salary type to the payslip?
Select Add new salary row on the Payslip row information tab to open a menu containing all salary types linked to the salary model.
How do I update a changed tax card percentage on an already created payslip?
Select Update payslip information button, which updates the changes in withholding tax directly to the slip.
How do I update the employee's changed basic data, such as professional category, to the earning payment report?
Select Return payslip initial values. This deletes manually added salary types and restores the information according to the employee's basic data, updating it also to the earning payment report.
Where can I see previous payslips for comparison?
Select Pay comparison on the payroll process page (the column where the percentage difference from the previous payslip is indicated) to compare the calculated payslip to previous payslips.
Keywords: Payslip, payroll, salary type row, processing history, allocation curve, pay comparison, income types, earning payment report, posting, cost center.
Did you find it helpful? Yes No
Send feedback